
参照コード:Chapter7-1(Gitです)
参照サイト:https://lwjglgamedev.gitbooks.io/3d-game-development-with-lwjgl/content/chapter07/chapter7.html
イントロダクション
前回は、Cubeを使って7 x 5マスを作りました。これだけではグラフになりませんのでこれに高さを与えてやる必要があります。
現状のソースは以下にようになってます。
@Override
    public void init(Window window) throws Exception {
        renderer.init(window);
        // Cubeのサイズ(たて、横、高さが同じなので値は1つ)
        final float cubeSize = 0.1f;
        // x軸の初期値
        final float xInit = 0;
        // y軸の初期値
        final float yInit = 0;
        // z軸の初期値
        final float zInit = -2;
        // x軸の増減幅
        final float xWidth = 0.185f;
        // y軸の増減幅
        final float yWidth = 0.033f;
        // z軸の増減幅
        final float zWidth = 0.1f;

        ArrayList arr = new ArrayList();
        for(int i = 1; i <= 7; i++) {
    		arr.add(createCube(
    				cubeSize, xInit + (xWidth * i), yInit + (yWidth * i), zInit - (zWidth * i)));
        }
        // 配列の要素数を指定する
        GameItem[] items = new GameItem[arr.size()];
        // 配列の取り出し
        gameItems = arr.toArray(items);
    }

    /* 追加したメソッドです */
    private GameItem createCube(float cubeSize, float posX, float posY, float posZ) {
        // Create the Mesh
        float[] positions = new float[]{
            // VO
            -1 * cubeSize,  cubeSize,  cubeSize,
            // V1
            -1 * cubeSize, -1 * cubeSize,  cubeSize,
            // V2
            cubeSize, -1 * cubeSize,  cubeSize,
            // V3
            cubeSize,  cubeSize,  cubeSize,
            // V4
            -1 * cubeSize,  cubeSize, -1 * cubeSize,
            // V5
            cubeSize,  cubeSize, -1 * cubeSize,
            // V6
            -1 * cubeSize, -1 * cubeSize, -1 * cubeSize,
            // V7
            cubeSize, -1 * cubeSize, -1 * cubeSize,
        };
        float[] colours = new float[]{
            0.5f, 0.0f, 0.0f,
            0.0f, 0.5f, 0.0f,
            0.0f, 0.0f, 0.5f,
            0.0f, 0.5f, 0.5f,
            0.5f, 0.0f, 0.0f,
            0.0f, 0.5f, 0.0f,
            0.0f, 0.0f, 0.5f,
            0.0f, 0.5f, 0.5f,
        };
        int[] indices = new int[]{
            // Front face
            0, 1, 3, 3, 1, 2,
            // Top Face
            4, 0, 3, 5, 4, 3,
            // Right face
            3, 2, 7, 5, 3, 7,
            // Left face
            6, 1, 0, 6, 0, 4,
            // Bottom face
            2, 1, 6, 2, 6, 7,
            // Back face
            7, 6, 4, 7, 4, 5,
        };
        Mesh mesh = new Mesh(positions, colours, indices);
        GameItem gameItem = new GameItem(mesh);
        gameItem.setPosition(posX, posY, posZ);
        gameItem.setRotation(20, 30, 0);
        return gameItem;
    }
現状のソースを修正する
現在の処理は次のような処理を行なっています。
- Cubeを作成するのに必要な値を初期化、作成の開始点を設定
- Cubeを複製するのに必要な値(Cube1つ分の移動する幅)を定義
- ループで7回、createCubeを呼ぶ処理を回す
- createCubeでCubeを作成する時にcubeSizeを渡す
- 上の赤字の部分を修正して次のように変更します。
- Cubeの高さを持っているArrayListを作成
- Cubeを作成するのに必要な値を初期化、作成の開始点を設定
- 1ヶ月分のマス(Cube)を作成するために5回ループを作成
- 「2」で指定した開始点にループした回数分ずらす処理を追加(1回目は変更なし)
- Cubeを複製するのに必要な値(Cube1つ分の移動する幅)を定義
- createCubeでCubeを作成する時にcubeSizeと高さを渡す
- ループで7回、createCubeを呼ぶ処理を回す
<今回のソース>
    @Override
    public void init(Window window) throws Exception {
        renderer.init(window);
        // Cubeの高さ
        ArrayList<float[]> floats = new ArrayList<>();
        floats.add(new float[] {0.2f, 0.12f, 0.3f, 0.001f, 0.1f, 0.25f, 0.1f});
        floats.add(new float[] {0.15f, 0.19f, 0.23f, 0.2f, 0.08f, 0.13f, 0.12f});
        floats.add(new float[] {0.1f, 0.2f, 0.4f, 0.001f, 0.2f, 0.05f, 0.15f});
        floats.add(new float[] {0.11f, 0.12f, 0.3f, 0.001f, 0.1f, 0.25f, 0.1f});
        floats.add(new float[] {0.12f, 0.13f, 0.14f, 0.015f, 0.16f, 0.17f, 0.18f});
        // Cubeの底面のサイズ(正方形)
        final float cubeSize = 0.1f;
        // x軸の初期値
        final float xInit = -0.5f;
        // y軸の初期値
        final float yInit = -0.8f;
        // z軸の初期値
        final float zInit = -2;
        // x軸の増減幅
        final float xWidth = 0.185f;
        // y軸の増減幅
        final float yWidth = 0.033f;
        // z軸の増減幅
        final float zWidth = 0.1f;
        ArrayList arr = new ArrayList();
        // 1ヶ月分(5週間分のマスを作る)
        for(int j = 1; j <= 5; j++) {
        	// 開始点より一列文ずらす
        	// X軸の開始点
        	float xStart = xInit - (0.1f * j);
        	// Y軸の開始点
        	float yStart = yInit + (0.06f * j) ;
        	// Z軸の開始点
        	float zStart = zInit - (0.16f * j);
            // 1週間分
        	float[] week = floats.get(j-1);
            for(int i = 1; i <= 7; i++) {
            	float val = week[i - 1];
        		arr.add(createCube(val,
        				cubeSize, xStart + (xWidth * i), yStart + (yWidth * i), zStart - (zWidth * i)));
            }
        }
        // 配列の要素数を指定する
        GameItem[] items = new GameItem[arr.size()];
        // 配列の取り出し
        gameItems = arr.toArray(items);
    }

    /* 追加したメソッドです */
    private GameItem createCube(float height, float cubeSize, float posX, float posY, float posZ) {
        // Create the Mesh
        float[] positions = new float[]{
            // VO
            -1 * cubeSize,  height,  cubeSize,
            // V1
            -1 * cubeSize, -1 * cubeSize,  cubeSize,
            // V2
            cubeSize, -1 * cubeSize,  cubeSize,
            // V3
            cubeSize,  height,  cubeSize,
            // V4
            -1 * cubeSize,  height, -1 * cubeSize,
            // V5
            cubeSize,  height, -1 * cubeSize,
            // V6
            -1 * cubeSize, -1 * cubeSize, -1 * cubeSize,
            // V7
            cubeSize, -1 * cubeSize, -1 * cubeSize,
        };
        float[] colours = new float[]{
            0.5f, 0.0f, 0.0f,
            0.0f, 0.5f, 0.0f,
            0.0f, 0.0f, 0.5f,
            0.0f, 0.5f, 0.5f,
            0.5f, 0.0f, 0.0f,
            0.0f, 0.5f, 0.0f,
            0.0f, 0.0f, 0.5f,
            0.0f, 0.5f, 0.5f,
        };
        int[] indices = new int[]{
            // Front face
            0, 1, 3, 3, 1, 2,
            // Top Face
            4, 0, 3, 5, 4, 3,
            // Right face
            3, 2, 7, 5, 3, 7,
            // Left face
            6, 1, 0, 6, 0, 4,
            // Bottom face
            2, 1, 6, 2, 6, 7,
            // Back face
            7, 6, 4, 7, 4, 5,
        };
        Mesh mesh = new Mesh(positions, colours, indices);
        GameItem gameItem = new GameItem(mesh);
        gameItem.setPosition(posX, posY, posZ);
        gameItem.setRotation(20, 30, 0);
        return gameItem;
    }
実行結果です
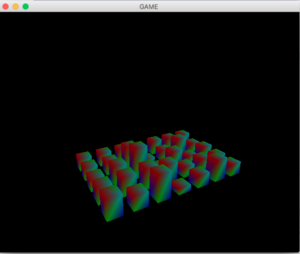
色がみんな同じなのでわかりづらいですね(笑)
続きは次回
でわでわ。。。
関連ページ一覧
<今回のやっていること>
<Java Basic>
- Java Basic for文 〜Step1_3_1〜
- Java Basic Level8 〜How to use for statement〜
- Java Basic Level 9〜Training of for statement〜
- Java 3DGame LWJGL GitBook chapter7-1〜Cube作成〜「動画あり」
<サイトマップ>
Mapping of Java Bassic JUnit Eclipse LWJGL IntelliJ Discord OpenCV RPi ~記事一覧~