今回は、Javaコードで計算処理を作ります。
ちなみに前回は、計算アプリの画面を作成しました。
Javaコードを書く
前回作成した画面は下のようなものです。
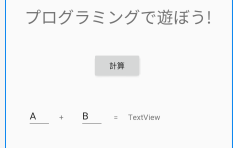
そして、今回はJavaでプログラミングを行います。
一番初めのHello Worldを思い出します。
実装してあるのは下のようなコードでした。
public class MainActivity extends AppCompatActivity {

    @Override
    protected void onCreate(Bundle savedInstanceState) {
        super.onCreate(savedInstanceState);
        setContentView(R.layout.activity_main);
    }
}
このコードに、作成したXMLの内容から画面の部品を取得するコードを追加します。
// 画面のコンポーネントを取得
TextView title = (TextView) findViewById(R.id.textView);
EditText firstData = (EditText) findViewById(R.id.editText1);
EditText secondData = (EditText) findViewById(R.id.editText2);
TextView answer = (TextView) findViewById(R.id.textView4);
// ボタンをクリックした時の動作
Button execute = (Button) findViewById(R.id.button);
execute.setOnClickListener(this);
そして「ボタンをクリックした時の動作」を実装します。
手順は以下の通りです。
- View.OnClickListenerを
implementsする - OnClick()をオーバーライドする
実装したコードで下のような実装があります。
// ボタンをクリックした時の動作
Button execute = (Button) findViewById(R.id.button);
execute.setOnClickListener(this);
この実装は、「MainActivityクラスをOnClickListenerとして使用します」という意味です。
早い話が、OnClickListener#onClick()がクリックしたときに動くわけです。
なので下のように実装してみました。
今回は起動の確認を行いたいので、仮実装になります。
@Override
public void onClick(View textView4) {
    String text = ((TextView) textView4).getText().toString();
    System.out.println("Value: " + text);
}
この引数にある「textView4」というのは、XMLで定義した画面の部品(TextView)です。
自分は、ボタンが謳歌された時の引数には「textView4」が渡されると思ったからこのような名前にしました。
XML以下の通り
<?xml version="1.0" encoding="utf-8"?>
<androidx.constraintlayout.widget.ConstraintLayout xmlns:android="http://schemas.android.com/apk/res/android"
    xmlns:app="http://schemas.android.com/apk/res-auto"
    xmlns:tools="http://schemas.android.com/tools"
    android:layout_width="match_parent"
    android:layout_height="match_parent"
    tools:context=".MainActivity">

        <TextView
            android:id="@+id/textView"
            android:layout_width="wrap_content"
            android:layout_height="wrap_content"
            android:text="@string/hello"
            android:textSize="30sp"
            app:layout_constraintBottom_toBottomOf="parent"
            app:layout_constraintRight_toRightOf="parent"
            app:layout_constraintLeft_toLeftOf="parent"
            app:layout_constraintTop_toTopOf="parent" >

        </TextView>

        <EditText
            android:id="@+id/editText1"
            android:layout_width="wrap_content"
            android:layout_height="wrap_content"
            android:ems="2"
            android:inputType="textPersonName"
            android:text="A"
            app:layout_constraintBottom_toBottomOf="parent"
            app:layout_constraintHorizontal_bias="0.02"
            app:layout_constraintTop_toTopOf="@+id/textView"
            app:layout_constraintLeft_toLeftOf="@+id/textView"
            app:layout_constraintRight_toRightOf="@+id/textView"
            app:layout_constraintVertical_bias="0.521"
            />

        <TextView
            android:id="@+id/textView2"
            android:layout_width="10dp"
            android:layout_height="20dp"
            android:text="+"
            app:layout_constraintTop_toTopOf="@+id/editText1"
            app:layout_constraintLeft_toRightOf="@+id/editText1"
            android:layout_margin="15dp"
            />

        <EditText
            android:id="@+id/editText2"
            android:layout_width="wrap_content"
            android:layout_height="wrap_content"
            android:layout_marginLeft="28dp"
            android:ems="2"
            android:inputType="textPersonName"
            android:text="B"
            app:layout_constraintTop_toTopOf="@+id/editText1"
            app:layout_constraintLeft_toRightOf="@+id/textView2"
            />

        <TextView
            android:id="@+id/textView3"
            android:layout_width="wrap_content"
            android:layout_height="wrap_content"
            android:text=" = "
            app:layout_constraintTop_toTopOf="@+id/editText1"
            app:layout_constraintLeft_toRightOf="@+id/editText2"
            android:layout_margin="15dp"
            />

        <TextView
            android:id="@+id/textView4"
            android:layout_width="wrap_content"
            android:layout_height="wrap_content"
            android:text="TextView"
            app:layout_constraintTop_toTopOf="@+id/editText1"
            app:layout_constraintLeft_toRightOf="@+id/textView3"
            android:layout_margin="15dp"
            />

        <Button
            android:id="@+id/button"
            android:layout_width="wrap_content"
            android:layout_height="wrap_content"
            android:layout_marginBottom="80dp"
            android:layout_marginLeft="76dp"
            android:text="計算"
            app:layout_constraintBottom_toBottomOf="@+id/textView2"
            app:layout_constraintLeft_toRightOf="@+id/editText1" />

</androidx.constraintlayout.widget.ConstraintLayout>
そして、実行してみます。
OnClickの実装は下の通りです。
@Override
public void onClick(View textView4) {
    String text = ((TextView) textView4).getText().toString();
    System.out.println("Value: " + text);
}
引数の文字列をコンソールに表示します。
それでは実行してみます。
色々と問題があります。が、今回はボタンをクリックした時の引数はなんなのか?を確かめるのが目的なので、ここに注力します。
実行した時のログで下のような文言が出力されていました。
com.zenryokuservice.myapplication I/System.out: Value: 計算
上のコードのSystem.out.println("Value: " + text);の部分がコンソール(Logcat)に出力されます。
そして、「計算」という文字の入った画面の部品があります。そーです。「ボタン」です。
なので、引数のViewは「Button」が入ってくるのです。
クラスが別?
「ViewとButtonは別クラスでわ?」と疑問に思った方、素晴らしい!
基本的には、別クラスなのでViewで受け取ることはできないのです。
ただし、インターフェースを実装していれば話は別になります。
ここで、ButtonクラスのJavaDocAPIをみてみます。

上のようにクラスの継承ツリーが書いてあります。
察しの良い方は気がついたと思いますが、「Button」クラスは「View」クラスの子供に当たるのです。
つまり、Viewクラスとして使用することができます。
(View) findViewById(R.id.button);
これでビルドエラーは出ません。ボタンとして使用できませんが。。。
とりあえずは、ここまでにします。
ここからちょっと複雑な話になります。
でわでわ。。。
<<< [前回](http://zenryokuservice.com/wp/2020/02/26/java-android-5%e3%80%9c%e8%a8%88%e7%ae%97%e3%82%a2%e3%83%97%e3%83%aa%e3%82%92%e4%bd%9c%e3%82%8b%e3%80%9c/)
## 関連ページ
・ カテゴリ別記事一覧
・ Java学習フロー(自分の提案するものです)
・ Javaでコンソールアプリを作る