LWJGLのセットアップを行います。
JOGLとか、Java3D系のフレームワークを試して見ましたが、3Dモデルをゲーム的に使用するのであれば、LWJGLが一番適当なフレームワークに思えるのでこちらを使用するための手順を記載します。
LWJGLの学習
を参考に、主にコピーして実行して。。。という形でやりました。
IntelliJ IDEA(新しい)
上記のLWJGLのチュートリアル・テキストを参考にセットアップしました。
ハローワールド(LWJGL版)
チャプター1を見ながら、実行しました。
まずは、LWJGLの起動確認を行わないと始まりません。
IntelliJ IDEAでセットアップ
まずは、IntelliJでプロジェクトの作成を行いますが、チュートリアルによると、ビルドツールとしてMavenを使用しているようなので、こちらもそのようにします。
そして、POMファイルを編集します。まずは\
    <profiles>
        <!-- Windows -->
        <profile>
            <id>windows-profile</id>
            <activation>
                <os>
                    <family>Windows</family>
                </os>
            </activation>
            <properties>
                <native.target>natives-windows</native.target>
            </properties>
        </profile>
    </profiles>
次に、依存関係(dependency)の追加を行います。
        <dependency>
            <groupId>org.lwjgl</groupId>
            <artifactId>lwjgl-platform</artifactId>
            <version>${lwjgl.version}</version>
            <classifier>${native.target}</classifier>
        </dependency>
最終的には、次のような形になりました。
<?xml version="1.0" encoding="UTF-8"?>
<project xmlns="http://maven.apache.org/POM/4.0.0"
         xmlns:xsi="http://www.w3.org/2001/XMLSchema-instance"
         xsi:schemaLocation="http://maven.apache.org/POM/4.0.0 http://maven.apache.org/xsd/maven-4.0.0.xsd">
    <modelVersion>4.0.0</modelVersion>

    <groupId>jp.zenryoku</groupId>
    <artifactId>3dloader</artifactId>
    <version>1.0-SNAPSHOT</version>

    <properties>
        <maven.compiler.source>8</maven.compiler.source>
        <maven.compiler.target>8</maven.compiler.target>
        <project.build.sourceEncoding>UTF-8</project.build.sourceEncoding>
        <built.by>lwjglgamedev</built.by>
        <main.class>org.lwjglb.game.Main</main.class>
        <!-- Versions -->
        <imgui-java.version>1.86.4</imgui-java.version>
        <exec-maven-plugin.version>3.0.0</exec-maven-plugin.version>
        <java.version>18</java.version>
        <joml.version>1.10.5</joml.version>
        <joml-primitives.version>1.10.4</joml-primitives.version>
        <lwjgl.version>3.3.1</lwjgl.version>
        <maven-compiler-plugin.version>3.10.1</maven-compiler-plugin.version>
        <maven-dependency-plugin.version>3.3.0</maven-dependency-plugin.version>
        <maven-jar-plugin.version>3.2.2</maven-jar-plugin.version>
        <maven-resources-plugin.version>3.2.0</maven-resources-plugin.version>
        <tinylog.version>2.5.0</tinylog.version>
    </properties>

    <profiles>
        <!-- Windows -->
        <profile>
            <id>windows-profile</id>
            <activation>
                <os>
                    <family>Windows</family>
                </os>
            </activation>
            <properties>
                <native.target>natives-windows</native.target>
            </properties>
        </profile>
    </profiles>

    <dependencies>
        <dependency>
            <groupId>org.lwjgl</groupId>
            <artifactId>lwjgl</artifactId>
            <version>${lwjgl.version}</version>
        </dependency>
        <dependency>
            <groupId>org.lwjgl</groupId>
            <artifactId>lwjgl-glfw</artifactId>
            <version>${lwjgl.version}</version>
        </dependency>
        <dependency>
            <groupId>org.lwjgl</groupId>
            <artifactId>lwjgl-opengl</artifactId>
            <version>${lwjgl.version}</version>
        </dependency>

        <!-- Natives -->
        <dependency>
            <groupId>org.lwjgl</groupId>
            <artifactId>lwjgl</artifactId>
            <version>${lwjgl.version}</version>
            <classifier>${native.target}</classifier>
            <scope>runtime</scope>
        </dependency>
        <dependency>
            <groupId>org.lwjgl</groupId>
            <artifactId>lwjgl-opengl</artifactId>
            <version>${lwjgl.version}</version>
            <classifier>${native.target}</classifier>
            <scope>runtime</scope>
        </dependency>
        <dependency>
            <groupId>org.lwjgl</groupId>
            <artifactId>lwjgl-glfw</artifactId>
            <version>${lwjgl.version}</version>
            <classifier>${native.target}</classifier>
            <scope>runtime</scope>
        </dependency>
    </dependencies>
</project>
ソースのダウンロード
プロジェクトのソースpom.xmlを右クリックしてソースのダウンロードを選択します。
これが結構な時間を必要としました。(Wifiのスピードが。。。)
ビルドして起動
Githubにあるソースをコピペーして、プログラムを実行しました。
package org.lwjglb;
import org.lwjgl.Version;
import org.lwjgl.glfw.*;
import org.lwjgl.opengl.GL;
import org.lwjgl.system.MemoryStack;
import java.nio.IntBuffer;
import static org.lwjgl.glfw.Callbacks.glfwFreeCallbacks;
import static org.lwjgl.glfw.GLFW.*;
import static org.lwjgl.opengl.GL11.*;
import static org.lwjgl.system.MemoryStack.stackPush;
import static org.lwjgl.system.MemoryUtil.NULL;
public class HelloWorld {
// The window handle
private long window;
public static void main(String[] args) {
new HelloWorld().run();
}
private void init() {
// Setup an error callback. The default implementation
// will print the error message in System.err.
GLFWErrorCallback.createPrint(System.err).set();
// Initialize GLFW. Most GLFW functions will not work before doing this.
if (!glfwInit())
throw new IllegalStateException("Unable to initialize GLFW");
// Configure GLFW
glfwDefaultWindowHints(); // optional, the current window hints are already the default
glfwWindowHint(GLFW_VISIBLE, GLFW_FALSE); // the window will stay hidden after creation
glfwWindowHint(GLFW_RESIZABLE, GLFW_TRUE); // the window will be resizable
// Create the window
window = glfwCreateWindow(300, 300, "Hello World!", NULL, NULL);
if (window == NULL)
throw new RuntimeException("Failed to create the GLFW window");
// Setup a key callback. It will be called every time a key is pressed, repeated or released.
glfwSetKeyCallback(window, (window, key, scancode, action, mods) -> {
if (key == GLFW_KEY_ESCAPE && action == GLFW_RELEASE)
glfwSetWindowShouldClose(window, true); // We will detect this in the rendering loop
});
// Get the thread stack and push a new frame
try (MemoryStack stack = stackPush()) {
IntBuffer pWidth = stack.mallocInt(1); // int*
IntBuffer pHeight = stack.mallocInt(1); // int*
// Get the window size passed to glfwCreateWindow
glfwGetWindowSize(window, pWidth, pHeight);
// Get the resolution of the primary monitor
GLFWVidMode vidmode = glfwGetVideoMode(glfwGetPrimaryMonitor());
// Center the window
glfwSetWindowPos(
window,
(vidmode.width() - pWidth.get(0)) / 2,
(vidmode.height() - pHeight.get(0)) / 2
);
} // the stack frame is popped automatically
// Make the OpenGL context current
glfwMakeContextCurrent(window);
// Enable v-sync
glfwSwapInterval(1);
// Make the window visible
glfwShowWindow(window);
}
private void loop() {
// This line is critical for LWJGL's interoperation with GLFW's
// OpenGL context, or any context that is managed externally.
// LWJGL detects the context that is current in the current thread,
// creates the GLCapabilities instance and makes the OpenGL
// bindings available for use.
GL.createCapabilities();
// Set the clear color
glClearColor(1.0f, 0.0f, 0.0f, 0.0f);
// Run the rendering loop until the user has attempted to close
// the window or has pressed the ESCAPE key.
while (!glfwWindowShouldClose(window)) {
glClear(GL_COLOR_BUFFER_BIT | GL_DEPTH_BUFFER_BIT); // clear the framebuffer
glfwSwapBuffers(window); // swap the color buffers
// Poll for window events. The key callback above will only be
// invoked during this call.
glfwPollEvents();
}
}
public void run() {
System.out.println("Hello LWJGL " + Version.getVersion() + "!");
init();
loop();
// Free the window callbacks and destroy the window
glfwFreeCallbacks(window);
glfwDestroyWindow(window);
// Terminate GLFW and free the error callback
glfwTerminate();
glfwSetErrorCallback(null).free();
}
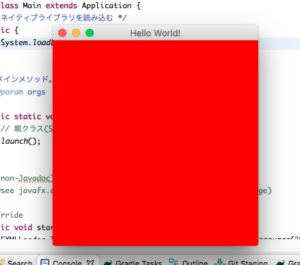
}実行結果

OBJLoaderを使う
GithubのOBJLoaderクラスをコピペして実装します。
-
次のクラスファイルをコピーして次のように、javaファイルを作成
OBJLoader.java、Obj.java -
pomファイルにリポジトリと依存関係を追加してソースをダウンロード
しかし、手順2で、次のようなエラーが出ました。
org.lwjgl:lwjgl-util:pom:2.7.1 failed to transfer from https://mvnrepository.com/artifact/org.lwjgl/lwjgl-util during a previous attempt. This failure was cached in the local repository and resolution is not reattempted until the update interval of utils has elapsed or updates are forced. Original error: Could not transfer artifact org.lwjgl:lwjgl-util:pom:2.7.1 from/to utils (https://mvnrepository.com/artifact/org.lwjgl/lwjgl-util): authorization failed for https://mvnrepository.com/artifact/org.lwjgl/lwjgl-util/org/lwjgl/lwjgl-util/2.7.1/lwjgl-util-2.7.1.pom, status: 403 Forbiddenなので、次の手順で解決しました。
- こちらのページからlwjgl-util-2.7.1.jarをダウンロード
- C:\Users\ユーザー名\.m2\repository\org\lwjgl\lwjgl-util\2.7.1のフォルダにJARファイルを配置
もしかしたら、良いこのみんなはやらないほうが良いかもしれません。。。
作成後のイメージは下のような感じです。

行った事のまとめ
- OBJLoader.javaの作成(コピペ)
- Obj.javaの作成(コピペ)
- lwjgl-util-2.7.1.jarのダウンロードとファイルの配置
配置先はC:\Users\ユーザー名\.m2\repository\org\lwjgl\lwjgl-util\2.7.1
Eclipseでの方法(古い)
ライブラリの作成した時の動画を下に載せます。Eclipseでのライブラリ追加を行いました。
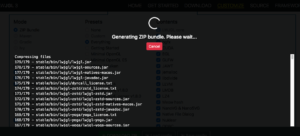
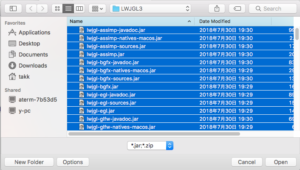
Zipのダウンロード
こちらのリンクからダウンロードサイトに移動できます。そして、下の方に「〜.zip」があるのでそれをダウンロードします。
そして、ダウンロードできたら、ライブラリ用のフォルダを作成します。上の動画では「LWJGL3」というフォルダを作成し、それをライブラリとして使用しました。細かいところは動画で実行しています。
追伸、全てをダウンロードすると(カスタムでは無い方)動画のように、jarファイルの仕分けをしないといけませんが、リンク先のとこだと、対象になるOSを選択してくれるので楽です。
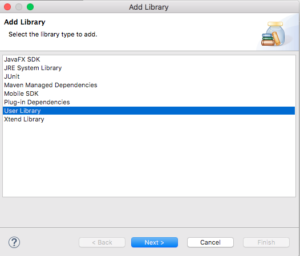
Eclipseにライブラリを追加
上の動画にもありますが、手順を記載しておきます。
- 対象になるプロジェクトを右クリック

- 「Add Library」ライブラリの追加でユーザーライブラリを選択
- ライブラリを作成してあれば下のようにライブラリを指定する
下のものはライブラリを作成済みで、追加済みなのでエラーになっています。
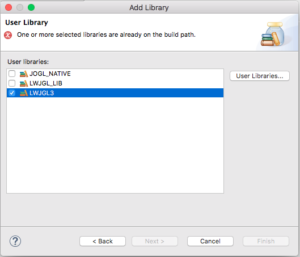
- ライブラリが無い時は作成する
3の画像で右のほうに「User Libraries」というボタンがあるのでそれをクリック - 下のような画面が立ち上がる

- Newボタンを押下
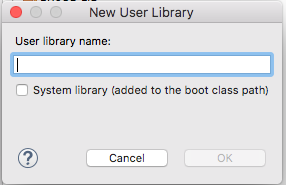
- 適当な名前を入力してライブラリ名にする(今回はテスト的に「NEW」と入力)

- NEWライブラリ(フォルダ)にJARファイルを追加(Add External Jarを選択する)
そして、忘れてはいけないのが、Nativeのことです。
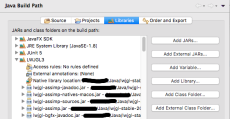
上のような感じで、
- ライブラリを開く
- Nativeライブラリロケーションを指定
これは、ダウンロードしたnative-<OS名>のあるディレクトリを指定するだけで良いです
これで、ライブラリフォルダが作成できるので作成したライブラリを選択してApplyしてやればオK!
実行テストをする
コードをコピーして、動かそうと思ったら、下のコードでエラーが出ました。
import static org.lwjgl.system.MemoryStack.*;
import static org.lwjgl.system.MemoryUtil.*;
この部分は、Nativeライブラリのロケーションを追加していないと出ます。
そして実行!
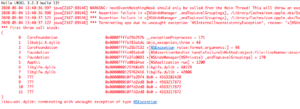
WARNING: nextEventMatchingMask should only be called from the Main Thread!
はて?何だろう?調べてみるとこちらのサイトで解決策がありました。MacOSの場合、上のようなエラーが出るということなので。。。
-XstartOnFirstThread をVMの引数に渡してやればOK!ということでした。
実行結果です。
とりあえずは、LWJGLを動かせたので、これでセットアップは完了ということになります。
Vertex3fクラスが無い
しかし、これで終わりではありませんでした。
今回の目的は、*.objファイルから3Dモデルを読み込みことなので、「Vertex3f」などのクラスも使用したい。。。
なので、こちらのJARファイルも必要なのでビルドパスに追加します。
そして、こちらのGithubリポジトリからObjFileLoaderをダウンロードします。 (パッケージ名などの細かいエラーは省略)
Displayクラスが無い
まだまだありました。。。org.lwjgl.opengl.Displayがlwjgl.jarにあるはずだけど、見つからず・・・。
探してみたところorg.lwjgl.utilにあるということでJARファイルをダウンロードしてきました。
MavenでDisplayModeクラスを追加
Mavenを使用する場合です。POM.xmlファイルに下の依存関係を追加します。
注意としては<dependencies>タグの中に追加するところです。
<dependency>
    <groupId>org.lwjgl.lwjgl</groupId>
    <artifactId>lwjgl</artifactId>
    <version>2.9.1</version>
</dependency>
ビルドエラーはとりあえず解消
今までのファイルをインポートすることで、ビルドエラーは解消できると思います。
そして、チュートリアルのページを見つけました。とりあえずこれを進めないことには、Objファイルが読み込みできないと思いました。
まとめ
- セットアップの手順はここのページを見て行う
- JARファイルのダウンロードは、ここのページで行う、使用しているOSに対応したJARをダウンロードできる
- lwjgl_util.jarをダウンロード(追加)する
- pom.xmlにlwjglを追加する(上記の依存関係を追加する)
<dependency>
<groupId>org.lwjgl.lwjgl</groupId>
<artifactId>lwjgl</artifactId>
<version>2.9.1</version>
</dependency>
でわ、でわ。。。