
イントロダクション
前回は、BlenderでのPythonスクリプト画面の表示、サンプルコードの実行などを行いました。
Blenderは下のような画面で3Dモデルを作れるフリーアプリケーションです。
今回は、前回にあるメモと参考サイトを見ながら、オブジェクト(立方体や、円)の作成を行いたいと思います。
オブジェクト作成
まずは、Blenderで作品を作成するには、立方体などのオブジェクトの作成を行うと思います。
この手で行う操作を、プログラムで実行しようというところです。
使用するコマンドについて
ここでいう「コマンド」というのは、「bpy.ops.XXX」のようなスクリプトの事です。
このコマンドを実行することで、オブジェクトが作成されます。コマンドの一覧はこちら本家のサイトを見ました。
コーン(Cone)を作成する
引数に関しては、すべて使用していません。使用する引数の名前を付けて実行します。
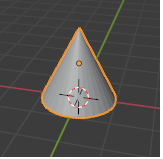
bpy.ops.mesh.primitive_cone_add(vertices=32, end_fill_type='TRIFAN', calc_uvs=True, location=(0,0,1), rotation=(0.0, 0.0, 0.0))
具体的には「vertices=32」のように頂点=32という形で引数を渡します。
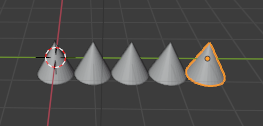
コマンドを実行すると下のように表示されます。
ここで、もう一つrotationの値を変更すると下のようになります。
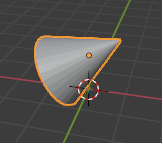
実行コマンドは下のようになります。
bpy.ops.mesh.primitive_cone_add(vertices=32, end_fill_type='TRIFAN', calc_uvs=True, location=(0,0,1), rotation=(0.0, 1.0, 0.0))
X軸方向に1だけ回転しています。
同様に、locationの値を変更すれば下のようになります。
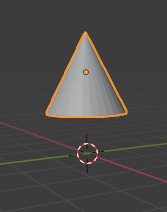
実行コマンドは下のようになります。
bpy.ops.mesh.primitive_cone_add(vertices=32, end_fill_type='TRIFAN', calc_uvs=True, location=(0,0,2), rotation=(0.0, 0.0, 0.0))
{'FINISHED'}
Z軸方向に2だけ移動しています。※もともと1移動していました。。。
連続してコーンを作成する
これに、プログラミングヨロシク、For文で縦に連続して作成してみます。
実行コードは下のようになります。
import bpy

for count in range(5):
     bpy.ops.mesh.primitive_cone_add(
        vertices=32
        , end_fill_type='TRIFAN'
        , calc_uvs=True
        , location=(0,0,count)
        , rotation=(0.0, 0.0, 0.0)
        , scale=(0.5, 0.5, 0.5))
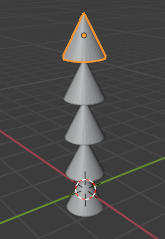
scaleを半分にしました。つまりは「0.5」です。
次は、For文で横に連続して作成してみます。
実行コードは下のようになります。
import bpy

for count in range(5):
     bpy.ops.mesh.primitive_cone_add(
        vertices=32
        , end_fill_type='TRIFAN'
        , calc_uvs=True
, rotation=(0.0, 0.0, 0.0)
        , scale=(0.5, 0.5, 0.5))
ひと工夫してみる
-
横だけでなく縦にも並べる
- ※X軸方向にも並べる処理を追加する
-
横人並べるた上で、それを一回転してみようというわけです。
なので、下のような出力が得られました。

実行コマンドは下のようになります。
import bpy

# change direction
for lines in range(0, 5):
    # put on line
    for count in range(0, 5):
         bpy.ops.mesh.primitive_cone_add(
            vertices=32
            , end_fill_type='NGON'
            , calc_uvs=True
            , location=(lines,count,0)
            , rotation=(0.0, 0.0, 0.0)
            , scale=(0.5, 0.5, 0.5))
ひと工夫してみる、その二
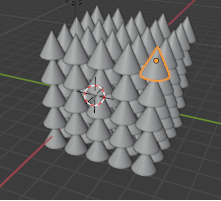
横だけでなく縦(Z軸方向)にも追加してみる
やり方は、上記のものと変わりません。ただし、X副方向ではなくZ軸方向に追加します。
実行結果
実行コマンドは下のようになります。
import bpy

# change height direction
for height in range(0,5):
    # change direction
    for lines in range(0, 5):
        # put on line
        for count in range(0, 5):
             bpy.ops.mesh.primitive_cone_add(
                vertices=32
                , end_fill_type='NGON'
                , calc_uvs=True
                , location=(lines,count,height)
                , rotation=(0.0, 0.0, 0.0)
                , scale=(0.5, 0.5, 0.5))
稀にみる3次元ループです(笑)
円状に並べてしてみる
実行結果
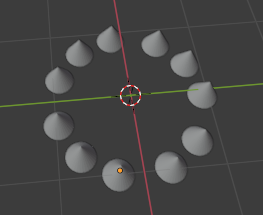
三角関数を使用してみました。数学嫌いだった過去が悔やまれる。。。
import bpy
import math

#for lines in range(0, 3):
for count in range(0, 11):
    rad = count * 36
    bpy.ops.mesh.primitive_cone_add(
        vertices=32
        , end_fill_type='NGON'
        , calc_uvs=True
        , location=(math.sin(rad), math.cos(rad), 0)
        , rotation=(0.0, 0.0, 0.0)
        , scale=(0.2, 0.2, 0.2))
まとめ
今回は、「コーン」で作成しましたが、これを「立方体」「モンキー(スザンヌ?)」「トーラス」と変えるだけで大して遊べると思います。
ペジェ曲線を作る(円)
、まずはサンプルコードから見ていきます。
from bpy import context, data, ops

# [1] Create a bezier circle and enter edit mode.
ops.curve.primitive_bezier_circle_add(radius=1.0,
                                      location=(0.0, 0.0, 0.0),
                                      enter_editmode=True)

# [2] Subdivide the curve by a number of cuts, giving the
# random vertex function more points to work with.
ops.curve.subdivide(number_cuts=16)

# [3] Randomize the vertices of the bezier circle.
# offset [-inf .. inf], uniform [0.0 .. 1.0],
# normal [0.0 .. 1.0], RNG seed [0 .. 10000].
ops.transform.vertex_random(offset=1.0, uniform=0.1, normal=0.0, seed=0)

# [4] Scale the curve while in edit mode.
ops.transform.resize(value=(2.0, 2.0, 3.0))

# Return to object mode.
ops.object.mode_set(mode='OBJECT')
[1]
ペジェ曲線の円を描画するbpy.ops.curve.primitive_bezier_circle_add
# Create a bezier circle and enter edit mode.
ops.curve.primitive_bezier_circle_add(radius=1.0,
                                      location=(0.0, 0.0, 0.0),
                                      enter_editmode=True)
まずはこれを作らないとはじまらない、そして、円もくねくねと曲げられるようです。
bpy.ops.curve.subdivide(number_cuts=1)
そして、これから、くねくねと曲げる処理ですが、下の部分がそれにあたります。
# Subdivide the curve by a number of cuts, giving the
# random vertex function more points to work with.
ops.curve.subdivide(number_cuts=16)

# Randomize the vertices of the bezier circle.
# offset [-inf .. inf], uniform [0.0 .. 1.0],
# normal [0.0 .. 1.0], RNG seed [0 .. 10000].
ops.transform.vertex_random(offset=1.0, uniform=0.1, normal=0.0, seed=0)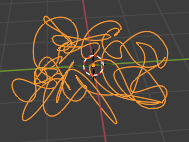
次はops.curve.subdivide(number_cuts=16)を見ていきます。
しかし、このままでは、よくわからないので、次の部分を16から8に変更します。
ちなみに、ops.transform.vertex_random(offset=1.0, uniform=0.1, normal=0.0, seed=0)の部分は
「頂点をランダム化する」処理のようです。
まとめると次のようになります。
1.4つの頂点を持つ円(ペジェ曲線)を作成: bpy.ops.curve.primitive_bezier_circle_add
- この4つの頂点を16回切る(細分化): bpy.ops.curve.subdivide(number_cuts=16)
- 1回切ると頂点は4 -> 8, 2回切ると4 -> 12, 3回切ると4 -> 16
- これらの頂点えおランダムに移動させる: bpyops.transform.vertex_random(offset=1.0, uniform=0.1, normal=0.0, seed=0)
なので、3回切った時のオブジェクトは下のようになりました。
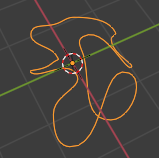
ペジェ曲線を作る(線)
上のコードを書き換えて実行してみます。[1]の部分を書き換えています。
ズバリprimitive_bezier_circle_addを
*[primitive_bezier_curve_add](https://docs.blender.org/api/current/bpy.ops.curve.html?highlight=primitive#bpy.ops.curve.primitive_bezier_curve_add)*に書き換えるだけです。
<実行したコード>
from bpy import context, data, ops

# [1] Create a bezier circle and enter edit mode.
ops.curve.primitive_bezier_curve_add(radius=1.0,
                                      location=(0.0, 0.0, 0.0),
                                      enter_editmode=True)

# [2] Subdivide the curve by a number of cuts, giving the
# random vertex function more points to work with.
ops.curve.subdivide(number_cuts=16)

# [3] Randomize the vertices of the bezier circle.
# offset [-inf .. inf], uniform [0.0 .. 1.0],
# normal [0.0 .. 1.0], RNG seed [0 .. 10000].
ops.transform.vertex_random(offset=1.0, uniform=0.1, normal=0.0, seed=0)

# [4] Scale the curve while in edit mode.
ops.transform.resize(value=(2.0, 2.0, 3.0))

# Return to object mode.
ops.object.mode_set(mode='OBJECT')
そうすると下のようなオブジェクトができました。
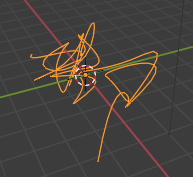
「なんだ、あまり変わらないではないか。。。」と感じた方、正常でございます。
自分もそう思います。
では、生成する頂点の数を減らしてみましょう。カットする回数を1回にします。
ops.curve.subdivide(number_cuts=1)
最終的な頂点の数は3つになりました。

まだまだ続きます。
でわでわ。。。
でわでわ。。。