ICU4Jを使う
Java Speach APIを使用して、入力したテキストを話させるアプリケーションを作成しようとしています。
しかし、日本語に対応したライブラリが見つけられず、また見つけても動かすに至りませんでした。
とりあえず動かせたのが、下のような形で動くFreeTtsというライブラリを使用したものです。
これで、入力した文字を次のように変換するための処理を行うのにICU4Jを使用するつもりです。本家のドキュメントはこちら
ICU4Jの追加
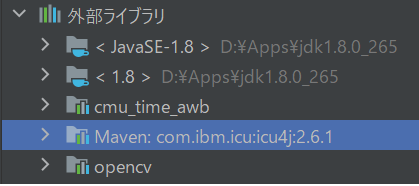
現在使用しているプロジェクト(IntelliJ IDEA)にICU4Jを使用するための設定を行います。
今回(毎回)使用するのはMavenです。Mavenではpom.xmlに依存関係を追加することで、様々なライブラリを使用することができます。
例えばSpringrameworkであれば下のように記載してMavenプロジェクトを更新(再ロード)すればOKです。
SpringBootの依存関係追加
<!-- https://mvnrepository.com/artifact/org.springframework.boot/spring-boot-starter-web -->
<dependency>
    <groupId>org.springframework.boot</groupId>
    <artifactId>spring-boot-starter-web</artifactId>
    <version>2.5.5</version>
</dependency>注意点としては、参照するリポジトリへアクセスできるかどうか?という問題がありますが、プロジェクトを更新(再ロード)してできなければリポジトリを追加してやればOKです。※ICU4Jの場合です。
   <repositories>
        <repository>
            <id>icu4j</id>
            <url>https://repo1.maven.org/maven2/</url>
        </repository>
    </repositories>
ICU4Jの追加
ずばり、下のように書きます。チェックすることとしては、最新のバージョンが2.6.1でよいかどうかです。
    <dependencies>
        <dependency>
            <groupId>com.ibm.icu</groupId>
            <artifactId>icu4j</artifactId>
            <version>2.6.1</version>
        </dependency>
    </dependencies>
これで、プロジェクトを更新(再ロード)すれば、ライブラリが追加されています。
これで実装する準備が整いました。
ICU4Jの実装
以前書いた記事でコピーして作成したコードを改造して実行するつもりなので、先に以前作成したコードを改造します。
初めに着手する部分は、BriefVoiceDemoクラスのメインメソッド部分を、部品化することです。
つまりは、メインメソッドはプログラムを起動する部分なので、これを起動される側に変更するというわけです。
具体的には
下のように、プログラムが書いてあります。下のコード中にコメントで次のような部分は自分が追記した部分であり
説明のための文言です。
【改修ポイント】
Synthesizer synthesizer;

public static void main(String[] args) {

    //default synthesizer values
    SynthesizerModeDesc modeDesc = new SynthesizerModeDesc(
            null,       // engine name
            "general",  // mode name use 'general' or 'time'
            Locale.JAPANESE,  // locale, see MBROLA Project for i18n examples
            null,       // prefer a running synthesizer (Boolean)
            null);      // preload these voices (Voice[])

    //default voice values
    Voice voice = new Voice(
            "kevin16",              //name for this voice
            Voice.AGE_DONT_CARE,   //age for this voice
            Voice.GENDER_DONT_CARE,//gender for this voice
            null);                 //prefer a running voice (Boolean)

    boolean error=false;
    for (int r=0;r<args.length;r++) {
        String token= args[r];
        String value= token.substring(2);

        //overide some of the default synthesizer values
        if (token.startsWith("-E")) {
            //modeDesc.setEngineName(value);
        } else if (token.startsWith("-M")) {
            //modeDesc.setModeName(value);
        } else
            //overide some of the default voice values
            if (token.startsWith("-V")) {
                voice.setName(value);
            } else if (token.startsWith("-GF")) {
                voice.setGender(Voice.GENDER_FEMALE);
            } else if (token.startsWith("-GM")) {
                voice.setGender(Voice.GENDER_MALE);
            } else
            //dont recognize this value so flag it and break out
            {
                System.out.println(token+
                        " was not recognized as a supported parameter");
                error = true;
                break;
            }
    }

    /* 1.【改修ポイント】メインメソッドは、自分のクラスをnewして動かすので、部品かするにはこのnew以降の処理がいらない */
    //The example starts here
    BriefVoiceDemo briefExample = new BriefVoiceDemo();
    if (error) {
        System.out.println("BriefVoiceDemo -E<ENGINENAME> " +
                "-M<time|general> -V<VOICENAME> -GF -GM");
        //list all the available voices for the user
        briefExample.listAllVoices();
        System.exit(1);
    }

    //select synthesizer by the required parameters
    briefExample.createSynthesizer(modeDesc);
    //print the details of the selected synthesizer
    briefExample.printSelectedSynthesizerModeDesc();

    //allocate all the resources needed by the synthesizer
    briefExample.allocateSynthesizer();

    //change the synthesisers state from PAUSED to RESUME
    briefExample.resumeSynthesizer();

    //set the voice
    briefExample.selectVoice(voice);
    //print the details of the selected voice
    briefExample.printSelectedVoice();

    /* 2.【改修ポイント】SpeakableListenerは必要な部品なので、削除しない */
    //create a listener to be notified of speech events.
    SpeakableListener optionalListener= new BriefListener();

    /* 3.【改修ポイント】ここから先は、読み上げ処理を実行する部分なので
     *    メインメソッドから呼び出されるように修正する。つまりは、削除する。
     */
    //The Date and Time can be spoken by any of the selected voices
    SimpleDateFormat formatter = new SimpleDateFormat("h mm");
    String dateText = "The time is now " + formatter.format(new Date());
    briefExample.speakTextSynchronously(dateText, optionalListener);

    //General text like this can only be spoken by general voices
    if (briefExample.isModeGeneral()) {
        //speak plain text
        String plainText =
                "Hello World, This is an example of plain text," +
                        " any markup like <jsml></jsml> will be spoken as is";
        briefExample.speakTextSynchronously(plainText, optionalListener);

        //speak marked-up text from Speakable object
        Speakable speakableExample = new BriefSpeakable();
        briefExample.speakSpeakableSynchronously(speakableExample,
                optionalListener);
    }
    //must deallocate the synthesizer before leaving
    briefExample.deallocateSynthesizer();
}
上のコード内にある「【改修ポイント】」読んでもらえば、どの部分を削除するのか、そのまま残すのか?がわかると思います。
最終的に変更したコードは、下のようになります。
private Synthesizer synthesizer;

private SpeakableListener optionalListener;

public BriefVoiceCls() {

    //default synthesizer values
    SynthesizerModeDesc modeDesc = new SynthesizerModeDesc(
            null,       // engine name
            "general",  // mode name use 'general' or 'time'
            Locale.JAPANESE,  // locale, see MBROLA Project for i18n examples
            null,       // prefer a running synthesizer (Boolean)
            null);      // preload these voices (Voice[])

    //default voice values
    Voice voice = new Voice(
            "kevin16",              //name for this voice
            Voice.AGE_DONT_CARE,   //age for this voice
            Voice.GENDER_DONT_CARE,//gender for this voice
            null);                 //prefer a running voice (Boolean)
    // シンセサイザーのセットアップ
    this.createSynthesizer(modeDesc);
    //print the details of the selected synthesizer
    this.printSelectedSynthesizerModeDesc();

    //allocate all the resources needed by the synthesizer
    this.allocateSynthesizer();

    //change the synthesisers state from PAUSED to RESUME
    this.resumeSynthesizer();

    //set the voice
    this.selectVoice(voice);
    //print the details of the selected voice
    this.printSelectedVoice();
    // ここでセットアップ処理はおしまい。

    //create a listener to be notified of speech events.
    optionalListener = new BriefListener();
}

/** このメソッドで話をするようにプログラムを作る。 */
public void execute(String talkMessage) {

}
BriefVoiceCls#execute()を外部(メインメソッド)から呼び出し、プログラムを実行する形で必要な処理を行えるように実装します。
要件を考える
やりたいことは次の通りです。画面(JavaFX)から入力した文字を読み上げる
なので、シンプルに、実行するメソッドの引数には入力した文字列を渡します。
そして、コンストラクタでセットアップ処理、ここでは、シンセサイザーのセットアップや使用する声(Voice)を選択するなどの処理を行っています。
<シンセサイザーのセットアップ>
//default synthesizer values
SynthesizerModeDesc modeDesc = new SynthesizerModeDesc(
       null,       // engine name
       "general",  // mode name use 'general' or 'time'
       Locale.JAPANESE,  // locale, see MBROLA Project for i18n examples
      null,       // prefer a running synthesizer (Boolean)
      null);      // preload these voices (Voice[])
<音声のセットアップ>
//default voice values
Voice voice = new Voice(
        "kevin16",              //name for this voice
        Voice.AGE_DONT_CARE,   //age for this voice
        Voice.GENDER_DONT_CARE,//gender for this voice
        null);                 //prefer a running voice (Boolean)
そして、リスナーも使用しているので残してあります。※デバック用に使用しているようです。
/**
 * Simple SpeakableListener
 *   Prints event type and the source object's toString()
 */
public class BriefListener implements SpeakableListener {

    private String formatEvent(SpeakableEvent event) {
        return event.paramString()+": "+event.getSource();
    }

    public void markerReached(SpeakableEvent event) {
        System.out.println(formatEvent(event));
    }

    public void speakableCancelled(SpeakableEvent event) {
        System.out.println(formatEvent(event));
    }

    public void speakableEnded(SpeakableEvent event) {
        System.out.println(formatEvent(event));
    }

    public void speakablePaused(SpeakableEvent event) {
        System.out.println(formatEvent(event));
    }

    public void speakableResumed(SpeakableEvent event) {
        System.out.println(formatEvent(event));
    }

    public void speakableStarted(SpeakableEvent event) {
        System.out.println(formatEvent(event));
    }

    public void topOfQueue(SpeakableEvent event) {
        System.out.println(formatEvent(event));
    }

    public void wordStarted(SpeakableEvent event) {
        System.out.println(formatEvent(event));
    }
}
処理のほとんどが、標準出力に情報を表示するものです。これで、入力した文字を引数に受けて処理を行う準備が整いました。
ICU4Jを使用する
世間でよく使用される言葉として「オブジェクト指向プログラミング」というのがあります。この言葉は、ヒトによっていろいろな解釈があるのでなるべく使わないようにしようと思います。
今回の実装方法としては、上記のようなもののことなのですが「具体的にどうやるか?」を中心に記載したいと思います。
追記すコードは極力少なくする
この記事で、余計な処理=new BriefVoice()のようにインスタンス化してからの処理、を削除しました。
そして、新たに作成したメソッドは「execute()」メソッドです。引数は、Stringで入力した文字が渡される想定です。
つまるところ、BriefVoiceClsのexecute()メソッドを呼び出してやればOKという形にしました。
具体的には、次のようなコードになります。
/** このメソッドで話をするようにプログラムを作る。 */
public void execute(String talkMessage) {
    this.speakTextSynchronously(talkMessage, optionalListener);
}
ここで残る問題は、本記事のタイトルであるICU4Jを使用する、漢字を含む日本語をすべてひらがなに変換する処理を作成することです。
ICU4Jで変換処理を実装
ここで、漢字→ひらがなへの変換処理を担当するクラスを作成します。
クラスの名前は「KanjiConverter」にします。そして、テストファーストの形で実装します。
初めに作成したのは、実際に動かすクラス(KanjiConverter)とこのクラスをテストするためのクラス(KanjiConverterTest)です。
そして、ICU4Jを使用する方法がわからないのでそれを調べます。
参考サイトはこちらです。
ICU4Jは漢字に対応してない?
調べてみると[「kuromoji」]()というライブラリも使用する必要があるということでした。
なので、この依存関係を追加します。※プロジェクトの再ロードを忘れないようにしましょう。
【kuromojiの使い方】
こちらのサイトを参考にしました。
まずは、kuromojiを使用してみるということで、下のようなコードをテストクラスで実行しました。
public class KanjiConverterTest {
    /** static メソッドはstatic修飾子がついてないと参照できない */
    private static KanjiConverter target;

    /** テストクラスをインスタンス化する時に行う処理 */
    @BeforeClass
    public static void init() {
        // 前処理でテスト対象クラスをインスタンス化
        target = new KanjiConverter();
    }

    /** インスタンスが解放されるとき、ガベージコレクションで実行 */
    @AfterClass
    public static void terminated() {
        target = null;
    }

    /** ICU4Jをとりあえず起動してみる */
    @Test
    public void test1() {
        Tokenizer tokeni = new Tokenizer();
        List<Token> list = tokeni.tokenize("本日は晴天なり");
        for (Token t: list) {
            System.out.println("Length: " + t.getAllFeatures().split(",").length);
            System.out.println(t.getSurface() + "\t" + t.getAllFeatures());
        }
    }
}
これで、出y録した結果が以下になります。
Length: 9
本日 名詞,副詞可能,,,,,本日,ホンジツ,ホンジツ
Length: 9
は 助詞,係助詞,,,,,は,ハ,ワ
Length: 9
晴天 名詞,一般,,,,,晴天,セイテン,セイテン
Length: 9
なり 助動詞,,,*,文語・ナリ,基本形,なり,ナリ,ナリ
取得した配列(カンマで区切られた数)は9個で固定のようです。
ならば、入力した文字列を各単語に分けてやればよさそうです。つまり、次の手順を踏みます。
- 各カタカナに対応する、発音文字列を前もってマップしておく
- 各単語をカタカナに変換
- 対応する発音をFreeTtsでスピーチさせる
実装する(テストクラス)
まずは、音声に変換するための文字列をマッピングします。なので、初めのBriefVoiceDemoクラスで書く発音の文字列を決めます。
次のような感じで発音できました。
これらの文字列と各カタカナを関連付けていきます。要領としては以下の通りです。
private static final String[] KANA_LIST = {"ア", "イ", "ウ", "エ", "オ", // 1
                                            "カ", "キ", "ク", "ケ", "コ", // 2
                                            "ガ", "ギ", "グ", "ゲ", "ゴ", // 3
                                            "サ", "シ", "ス", "セ", "ソ", // 4
                                            "ザ", "ジ", "ズ", "ゼ", "ゾ", // 5
                                            "タ", "チ", "ツ", "テ", "ト", // 6
                                            "ダ", "ヂ", "ヅ", "デ", "ド", // 7
                                            "ナ", "ニ", "ヌ", "ネ", "ノ", // 8
                                            "ハ", "ヒ", "フ", "ヘ", "ホ", // 9
                                            "バ", "ビ", "ブ", "ベ", "ボ", // 10
                                            "マ", "ミ", "ム", "メ", "モ", // 11
                                            "ヤ", "ユ", "ヨ", // 12
                                            "ラ", "リ", "ル", "レ", "ロ", // 13
                                            "ワ", "ヲ", "ン", // 14
                                        };

String[] moji = {"ah", "yee" , "hu", "a", "oh" // 1
    , "kah", "kee", "ku", "ckea", "koh" // 2
    , "gaah", "gy", "goo", "gue", "goh" // 3
    , "saeh", "see", "su", "thea", "soh" // 4
    , "zaeh", "zee", "zoo", "zea", "zoh" // 5
    , "taeh", "tiee", "tsu", "te", "toh" // 6
    , "daeh", "dgee", "do", "de", "doh" // 7
    , "naeh", "niee", "nuh", "nea", "noh" // 8
    , "haeh", "hiee", "hu", "hea", "hoh" // 9
    , "baeh", "bee", "boo", "be", "boh" // 10
    , "maeh", "miee", "muh", "me", "moh" // 11
    , "yaeh", "yu", "yoh" // 12
    , "ra", "ri", "ru", "re", "roh" // 13
    , "wa", "oh", "um"}; // 14

// サイズ(長さ)はおなじなので
for (int i = 0; i < KANA_LIST.length; i++) {
    String key = KANA_LIST[i];
    String value = moji[i];
    talkMap.put(key, value);
}
これで入力文字を発音用の文字列に変換し再生します。作成したクラスは次の通りです。
public class BriefVoiceClsTest {
    private static BriefVoiceCls target;
    @BeforeClass
    public static void init() {
        target = new BriefVoiceCls();
    }

    @Test
    public void testTalkVoice() {
        target.execute("本日は晴天なり");
    }
}
<実行結果>
文字を発音用の文字に変換する
今までに、カタカナは変換できましたが、英語や数字に関しては、触れていませんでした。
なので、入力した部分(文字)はNULLになり、スペースで何も発音されません。
ここで、プログラムに修正を加えます。
カタカナを変換するクラス「KanjiConverter」を修正してやります。
マップrに登録した値を変換→カタカナ1文字を発音用の文字列に変換します。
for (char ch : chars) {
    String note = this.talkMap.get(String.valueOf(ch));
    String append = note == null ? " " : note;
    build.append(append + " ");
}これで変数chに「ア」が入っているときは「ah」という文字列に変換されます。
具体的には「String note = this.talkMap.get(String.valueOf(ch));」の部分で変数「note」に値が入ります。
この状態で「本日は晴天なり」と入力したときには「hoh um zee tsu wa thea yee te um naeh ri 」という文字列に変換されます。
この文字列を発音(Speach)させるとそれっぽく聞こえます。
これで、発音用の文字列に変換できるのですが、以下の部分で想定通りに動きません。
- 普通に英語を話したいとき
- 数字を読むとき
これらを解決するには、文章を単語に分解した後に、最後の部分、以下のコードを参照ください。
public String convert(String inputText) {
    List<Token> list = tokenizer.tokenize(inputText);
    StringBuilder build = new StringBuilder();

    for (Token token : list) {
        String[] splits = token.getAllFeatures().split(",");
        if (splits[8].equals("*")) {
            build.append(token.getSurface() + " ");
        } else {
            build.append(splits[8] + " ");
        }
    }
    return build.toString();
}
入力した文字列を変数(引数)「inputText」に渡した状態で処理を行います。例えば「本日は晴天なり」がinputTextに入ります。
これを単語に分解しているのが、token.getAllFeatures().split(",");の部分であり、返り値(String[])の8番目には
カタカナが入るのですが、英語や数字の場合は「*」が入っていますのでその場合は単語をそのまま取得して返却する文字列に追加します。
具体的には、下のコードです。
if (splits[8].equals("*")) {
    build.append(token.getSurface() + " ");
} else {
    build.append(splits[8] + " ");
}
でわでわ。。。