画面作成
作成したのは、以下の機能です。
- 多言語化
- 画面に文字列を表示する
stringc.xmlを使う
下のように作成した*strings.xmlの中にある「android\:id="@+id\/top_title"」をアプリに反映するというところです。
次のファイルに以下の1行を追加しました。
android:id="@+id/top_title"全体を記述すると下のようになります。
<activity_main.xml>
<?xml version="1.0" encoding="utf-8"?>
<androidx.constraintlayout.widget.ConstraintLayout xmlns:android="http://schemas.android.com/apk/res/android"
    xmlns:app="http://schemas.android.com/apk/res-auto"
    xmlns:tools="http://schemas.android.com/tools"
    android:layout_width="match_parent"
    android:layout_height="match_parent"
    tools:context=".MainActivity">

    <TextView
        android:id="@+id/top_title"
        android:layout_width="wrap_content"
        android:layout_height="wrap_content"
        android:text="@string/app_name"
        app:layout_constraintBottom_toBottomOf="parent"
        app:layout_constraintHorizontal_bias="0.534"
        app:layout_constraintLeft_toLeftOf="parent"
        app:layout_constraintRight_toRightOf="parent"
        app:layout_constraintTop_toTopOf="parent"
        app:layout_constraintVertical_bias="0.05" />

</androidx.constraintlayout.widget.ConstraintLayout>
<strings.xml>
<resources>
    <string name="app_name">目標達成アプリ</string>
</resources>
これを実行した結果、下のように表示されました。
テキストのサイズ変更
したのようなプロパティ(属性)を設定することで、テキストのサイズを変更できました。
        android:layout_width="match_parent"
        android:layout_height="100dp"
そして、自動サイズ調整はしたのようにやるみたいです。
android:autoSizeTextType="uniform"
android:autoSizeMinTextSize="12sp"
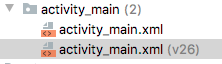
android:autoSizeMaxTextSize="100sp"これを記述するとAndroid APIのレベル別のactivity_main.xmlが作成されるようです。
※Android Studioで「Override XXX」 と表示されるのでそれをクリックしました。
最終的に、下のようなファイルが作成されました。
イメージの追加
説明を文言でするよりも、動画の方がよいと思いました。
サポートライブラリ追加
ここで、エラーが発生しています。これは、AppCompatというサポートライブラリが無いために起きているエラーです。
これをインストールするためには、Java11が必要になります。
JDK11インストール
WidnowsでのAndroid Studioが起動できなかったので、現在はMacで作業をしていますので、home brewを使用してインストールしました。参考サイトはこちらです。
下のコマンドでインストールできました。
brew install java11
しかし、次のようなエラーが出ました。
Invalid Gradle JDK configuration found
これは、プロジェクト構成(Project Structure) -> SDKLocation -> JDKの設定でJava11tを設定し、改めてビルドしたらなおりました。

Android Studioアップグレード
そして、初めのイメージを設定する部分ですが、次のようなエラーが出ました
Sets a drawable as the content of this ImageView. Allows the use of vector drawable when running on older versions of the platform.
これは、Android Studioをアップデートしてください。というものでした。。。
こちらのサイトを参考にAndroid Studioは下のようにConfigure -> Check for Updateを選択します。
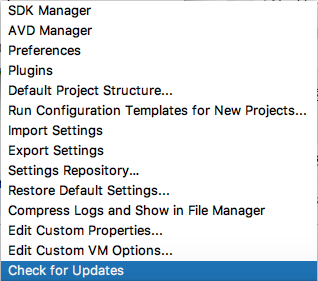
しかし、選択肢が「Download」しかなかったので、結局新しいものをダウンロード、インストールすることになりました。
最終的に置き換えるという形で、アップグレードしました。
まだ、エラーが解消されません。。。
This view is not constrained. It only has designtime positions, so it will jump to (0,0) at runtime unless you add the constraints
ここのサイトを参考にすると設定を追加すると治るということなので、次のようにプロパティを追加しました。
    <ImageView
        android:id="@+id/imageView2"
        android:layout_width="wrap_content"
        android:layout_height="wrap_content"
        app:srcCompat="@drawable/ic_add_mokuhyo"
        tools:layout_editor_absoluteX="50dp"
        tools:layout_editor_absoluteY="222dp"
        app:layout_constraintLeft_toLeftOf="parent"
        app:layout_constraintRight_toRightOf="parent"
        app:layout_constraintTop_toTopOf="parent"
        tools:ignore="VectorDrawableCompat" />
追加したのは、次の部分です。
        app:layout_constraintLeft_toLeftOf="parent"
        app:layout_constraintRight_toRightOf="parent"
        app:layout_constraintTop_toTopOf="parent"
そして、英語、日本語と多言語化した場合は、下の3つのファイルに文字列を追加する必要がありました。
- strings.xml(default)
- strings.xml(ja)
- strings.xml(en)
イメージのレイアウト
結構手こずりました。下のサイトを参考に学習しました。
色々と試したけど結局実行するデバイスを>色々と試したけど結局実行するデバイスを 新しくして試すことにしました。。。
どうやらしているする属性が違うようでした。こちらのサイトでありました。
 <LinearLayout
     xmlns:android="http://schemas.android.com/apk/res/android"
     android:layout_width="match_parent"
     android:layout_height="match_parent">
     <ImageView
         android:layout_width="wrap_content"
         android:layout_height="wrap_content"
         android:src="@drawable/my_image"
         android:contentDescription="@string/my_image_description"
         />
</LinearLayout> android:src="@drawable/my_image"この部分が自動生成したものと値が違う。。。
そして、レイアウトの設定も問題がありそうなので、本家のサイトを参考にレイアウトも学習します。
何かしら触っていると、わかってくるような感じで説明がうまくできないのですが、 各値を設定してやると、見た目も変更されるのでそれで、自分の思った通りに修正するのが、早いと思います。
画像が表示されいない問題
これの原因がわかりました。SDKのバージョン別にactivity_main.xmlが存在していました。
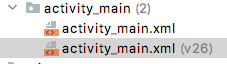
これが原因で、一向に画像が表示されなかった。。。というわけでした。。。
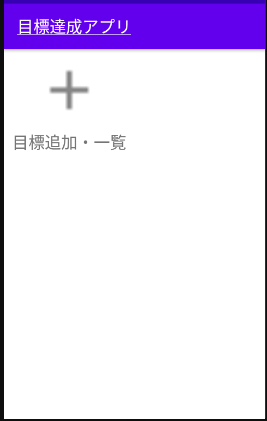
最終的に作成したactivity_main.xmlは下のようなものです。
<?xml version="1.0" encoding="utf-8"?>
<androidx.constraintlayout.widget.ConstraintLayout xmlns:android="http://schemas.android.com/apk/res/android"
    xmlns:app="http://schemas.android.com/apk/res-auto"
    xmlns:tools="http://schemas.android.com/tools"
    android:layout_width="match_parent"
    android:layout_height="match_parent"
    tools:context=".MainActivity">

    <TableLayout
        android:layout_width="match_parent"
        android:layout_height="match_parent">

        <TableRow
            android:layout_width="178dp"
            android:layout_height="192dp">

            <LinearLayout
                android:layout_width="match_parent"
                android:layout_height="match_parent"
                android:orientation="vertical">

                <ImageView
                    android:id="@+id/imageView3"
                    android:layout_width="80dp"
                    android:layout_height="80dp"
                    android:layout_marginStart="40dp"
                    android:layout_marginTop="10dp"
                    android:contentDescription="目標追加・一覧"
                    android:src="@drawable/ic_add_mokuhyo"
                    android:visibility="visible"
                    app:layout_constraintStart_toStartOf="parent"
                    app:layout_constraintTop_toTopOf="parent"
                    tools:srcCompat="@drawable/ic_add_mokuhyo" />

                <TextView
                    android:id="@+id/textAddMokuhyo"
                    android:layout_width="180dp"
                    android:layout_height="wrap_content"
                    android:layout_marginStart="10dp"
                    android:layout_marginTop="10dp"
                    android:autoSizeMaxTextSize="40dp"
                    android:autoSizeMinTextSize="18dp"
                    android:text="目標追加・一覧"
                    android:textSize="20dp"
                    android:visibility="visible"
                    app:layout_constraintStart_toStartOf="parent"
                    app:layout_constraintTop_toBottomOf="@id/imageView3" />
            </LinearLayout>

        </TableRow>

        <TableRow
            android:layout_width="match_parent"
            android:layout_height="match_parent" >

            <LinearLayout
                android:layout_width="match_parent"
                android:layout_height="match_parent"
                android:orientation="vertical"></LinearLayout>
        </TableRow>

    </TableLayout>

</androidx.constraintlayout.widget.ConstraintLayout>
LinerLayoutを学ぶ
よく使用されるであろうレイアウトの1つとして「LinerLayout」があります。ドキュメントにも載っているので基本的なレイアウトなのであろうと思いこれを学ぶことにしました。
LinearLayout は、すべての子を垂直または水平の一方向に揃えるビューグループです。android\:orientation 属性でレイアウトの方向を指定できます。
とりあえずは、コンポーネント(ボタンなどの部品)を並べてみます。そして、プロパティ(android\:XXXX)の値を変えてどのような配置になるかみてみたいと思います。
ここで、着目するプロパティを以下に示します。
| プロパティ名 | 内容 | |
|---|---|---|
| android\:orientation | レイアウトの方向を指定 | |
| android\:layout_weight | 画面上で占めるスペースという観点で「重要度」を表す値をビューに指定します。この weight 値が大きいほど、親ビューの残りのスペースを埋めるように拡大されます。子ビューに weight 値を指定することで、ビューグループの残りのスペースを、宣言された weight の割合に応じて割り当てることができます。デフォルトの weight 値は 0 です。 | |
| android\:layout_height android |
:layout_width android\:layout_weight |
それぞれの値を0dp、0dp、1に設定することで均等配分することができます。 |
ちょっと試してみましたが、他のプリパティと組み合わせる必要があるので、色々やってみないと理解できません。
次は、合わせて出てきた、TextViewに関してもプロパティを見てみます。
感想
- レイアウトの使い方、センタリングなど、やり方を調べると色々出てくるので手が止まることは少なくなりそうだ。
- レイアウトマネージャー(動画にある画面)での操作はわかりやすいが、プロパティの場所を探すのが大変だった。
でわでわ。。。