Bluetooth受信サーバーを作る〜 MicrobitからのBluetooth通信: JavaME(SDK)インストール〜

ラズパイ(RPi)でMicrobitからのBluetooth経由でのデータ(ボタン押下、メッセージなど)を受信するために、以下の準備をします。

Javaサーバーを立ててモニョモニョやろうと考えているのですが。。。具体的には、MIDIメッセージをMIDI音源に送信して音を鳴らす。ということ考えています。

イメージとしてはこんな感じです。

Bluetooth通信

MIcrobitからのBluetooth通信を行うのには、リンク先のサイトを参考にしてみるとBluetoothサービスを使用してやるようです。

そして、問題のJavaサーバー側を実装しようと思い色々と調べていたら。。。

Mavenを使おう(失敗)

上のような考えに至りました。理由は以下の通りです。

使用できるAPIをMaven(Gladleなど)でインストールして実行したほうが早い

そして、以下のライブラリをダウンロード(POM使用)します。
詳細に関してはこちらのリンクを参照してください。POMファイルにコピペできます。

  1. blueCove
  2. javax.microedition: midpの方はビルドエラー

調べてみると、2の方はJavaMEのライブラリのようでした。
つまりは、JavaMEで開発しましょうという事になりました(笑)

JavaME

調べてみると、開発するOSに依存するようです。(まぁそうなるよなぁ。。。)なので開発するのにはライブラリなどまとまったものをインストールするほうが楽だろうという判断に至りました。

調べた結果

色々調べて見たらMacOSでやる場合は、自分の描いているようにPCで開発、テスト、実機へデプロイと言うのができないようです。。。。
J2ME開発をやるならばWindowsで。。。と言うとこ炉に至りました。

以下は調べて見た結果です。

NetBeensで環境構築はWindowsのみ

以下は失敗した記事です。結局はNetBeensを使用してやるのが良いとなりました。

なので、以下の環境で開発する方向でやる事にします。

  1. Exlipseのプラグインを使用する
  2. PC(Mac)上で作成したものをラズパイにインストールする、もしくはソースをラズパイでPULLしてコンパイル、実行ファイル作成

上のような方法で開発する方向で行こうと思います。
なので、以下の手順で行います。

  1. ここのページからEclipseプラグイン(JavaME SDK)をダウンロード
  2. Eclipseにプラグインを追加する

Macの場合はEclipseでやらないほうが良い

サポートされているのがv3.0までのようで。。。
そんなわけで以前使っていたIntelliJ IDEAを使用してやろうと思います。
しかし、調査が先になります。
とりあえずMac版をダウンロードします。

そして、オープンソースな方を選びます。

そして、APPストア以外のインストールなので、ファインダーから開き、右クリック(controlボタンを押しながら)して開きます。
最終的にはこんな感じでJ2MEのプラグインをインストールしました。


以下失敗したものです

理解するまでに時間がかかりましたが。。。
どうやら上のプラグイン(SDK)をインストールする事で、Mavenのエラーを解消できたみたいです。なので下のような実装をしてもビルドエラーが出なくなりました。

import java.io.IOException;

import javax.bluetooth.L2CAPConnection;
import javax.bluetooth.L2CAPConnectionNotifier;
import javax.microedition.io.Connector;

/**
 * BluetoothAPIを使用して実装する。
 * @author takunoji
 * 
 * 2019/10/06
 */
public class Main {
    public static void main(String[] args) {
        try {
            L2CAPConnectionNotifier server = (L2CAPConnectionNotifier)
            Connector.open("btl2cap://localhost:3B9FA89520078C303355AAA694238F08;name=L2CAP Server1");
            L2CAPConnection cliCon = (L2CAPConnection)server.acceptAndOpen();
        } catch (IOException e) {
            /* Handle the failure to setup a connection. */
        }
    }
}

参考にしたものはJSR82のソースの入ったZIPファイルをダウンロードした時に付いていたPDFにあるソースです。
そして、プラグイン(SDK)をインストールした時に名前が一致しなかったので、インストールしたものを下に記載しておきます。

まとめ

今までやったことを整理して、まとめます。
正しい作業フローは以下のようになります。

  1. プラグイン(SDK)をEclipseにインストールする
  2. MavenでBluetoothAPI(BlueCove, javax.microeditionなど)をインストールする(POMファイル使用)

作成したPOMファイルは以下のようなものができました。

<project xmlns="http://maven.apache.org/POM/4.0.0" xmlns:xsi="http://www.w3.org/2001/XMLSchema-instance"
  xsi:schemaLocation="http://maven.apache.org/POM/4.0.0 http://maven.apache.org/maven-v4_0_0.xsd">
  <modelVersion>4.0.0</modelVersion>
  <groupId>zenryokuservice</groupId>
  <artifactId>socket.server</artifactId>
  <version>0.0.1-SNAPSHOT</version>

  <properties>
      <java.version>1.8</java.version>
      <maven.compiler.target>${java.version}</maven.compiler.target>
      <maven.compiler.source>${java.version}</maven.compiler.source>
  </properties>  

  <repositories>
    <repository>
      <id>microedition</id>
      <name>microedition</name>
      <url> https://mvnrepository.com/artifact/javax.microedition/midp</url>
    </repository>
    <repository>
      <id>microemu-extensions</id>
      <name>jsr82</name>
      <url>https://mvnrepository.com/artifact/org.microemu/microemu-jsr-82</url>
    </repository>
    <repository>
      <id>bluecove</id>
      <name>bluecove</name>
      <url>https://mvnrepository.com/artifact/net.sf.bluecove/bluecove</url>
    </repository>
  </repositories>

  <dependencies>
    <dependency>
        <groupId>org.microemu</groupId>
        <artifactId>microemu-jsr-82</artifactId>
        <version>2.0.4</version>
    </dependency>
    <dependency>
      <groupId>junit</groupId>
      <artifactId>junit</artifactId>
      <version>4.11</version>
      <scope>test</scope>
    </dependency>
    <dependency>
      <groupId>net.sf.bluecove</groupId>
      <artifactId>bluecove</artifactId>
      <version>2.1.0</version>
    </dependency>
  </dependencies>
  <build>
   <plugins>
    <plugin>
      <artifactId>maven-assembly-plugin</artifactId>
      <configuration>
        <archive>
          <manifest>
            <addClasspath>true</addClasspath>
            <mainClass>zenryokuservice.socket.server.SocketServerBasic</mainClass>
            <classpathPrefix>dependency-jars/</classpathPrefix>
          </manifest>
          </archive>
          <descriptorRefs>
            <descriptorRef>jar-with-dependencies</descriptorRef>
          </descriptorRefs>
      </configuration>
      <executions>
        <execution>
          <id>make-assembly</id> <!-- this is used for inheritance merges -->
          <phase>package</phase> <!-- bind to the packaging phase -->
          <goals>
            <goal>single</goal>
          </goals>
        </execution>
      </executions>
    </plugin>
    <plugin>
      <groupId>org.apache.maven.plugins</groupId>
      <artifactId>maven-dependency-plugin</artifactId>
      <version>2.5.1</version>
      <executions>
        <execution>
          <id>copy-dependencies</id>
          <phase>package</phase>
          <goals>
          <goal>copy-dependencies</goal>
          </goals>
          <configuration>
           <outputDirectory>
             ${project.build.directory}/dependency-jars/
           </outputDirectory>
          </configuration>
         </execution>
       </executions>
     </plugin>
   </plugins>
  </build>
</project>

java bluetooth API 〜ラズパイでbluetooth通信の実装を試みる〜

マイクロビットからラズパイ経由でMIDI音源を鳴らすことを目標にしています。イメージ図は下のようなものです。

今回はここのMicrobitからラズパイ(RPi)へデータを飛ばした時にラズパイで受け取るための装置を作ろうと思っています。

Bluetooth通信

ラズパイ上でBluetooth通信をしたいと思い、色々と調べているとこのようなページを見つけました。
ここにはBlueCoveというライブラリを使用してラズパイでJavaを起動してBluetooth通信を行う時につまづいたのでなにやらとやり取りをしている掲示板でした。
早い話が、BlueCoveをつかえばBluetoothを使用できそうだということです。がしかしプロジェクトは終了しているのか、メインプロジェクト

JSR-82

上のような規格(仕様)があります、大雑把に、Bluetooth通信の仕様を決めているものです。上のリンク先がJSR-82のサイトになります。JSR 82: JavaTM APIs for Bluetooth

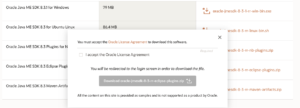
そして、JavaTM APIs for Bluetoothのページからダウンロードできるようです。しかし、色々あってよくわからな買ったので最後に行き着いたとこのリンクをここに貼っておきます。
zipファイルにjavax.bluetooth.*が入っていました。そして下にあるサンプルコードが記載されているPDFファイルも入っているのでそれも参照します。

このZIPファイルをダウンロードして、Eclipseの設定からビルドパスに追加します。

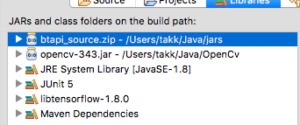
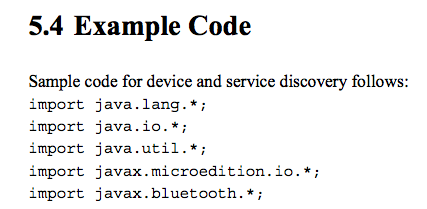
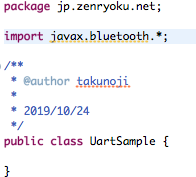
そうすると下のように「javax.bluetooth.*」をインポートでいます。

ここからがBluetoothとの戦いが始まります。そして、これはクライアントアプリのサンプルコードです。
目的の実装はサーバー側の実装になりますが、入り口(イントロダクション)的に下に記載します。

Bluetoothサンプルコード

ちょうどダウンロードしたZIPに(上のZIPファイルに)PDFファイルが入っていましたので、ここに記載します。(コピペです)
こいつ(サンプルコード)を参考にBluetooth通信を試みます。
<とりあえずはクライアント側の実装です。>

import java.lang.*;
import java.io.*;
import java.util.*;
import javax.microedition.io.*;
import javax.bluetooth.*;
/**
* This class shows a simple client application that performs device
* and service
* discovery and communicates with a print server to show how the Java * API for Bluetooth wireless technology works.
*/
public class PrintClient implements DiscoveryListener {
/**
* The DiscoveryAgent for the local Bluetooth device. */
    private DiscoveryAgent agent;
/**
* The max number of service searches that can occur at any one time. */
    private int maxServiceSearches = 0;
/**
* The number of service searches that are presently in progress. */
    private int serviceSearchCount;
/**
* Keeps track of the transaction IDs returned from searchServices. */
    private int transactionID[];
/**
* The service record to a printer service that can print the message
 April 5, 2002 Java APIs for Bluetooth Wireless Technology (JSR-82)
21
ALL RIGHTS RESERVED UNDER JSPA (JAVA SPECIFICATION PARTICIPATION AGREEMENT)
 * provided at the command line.
 */
private ServiceRecord record;
/**
* Keeps track of the devices found during an inquiry. */
private Vector deviceList;
/**
* Creates a PrintClient object and prepares the object for device
* discovery and service searching.
*
* @exception BluetoothStateException if the Bluetooth system could not be * initialized
*/
public PrintClient() throws BluetoothStateException {
/*
* Retrieve the local Bluetooth device object. */
LocalDevice local = LocalDevice.getLocalDevice();
/*
* Retrieve the DiscoveryAgent object that allows us to perform device * and service discovery.
*/
    agent = local.getDiscoveryAgent();
/*
* Retrieve the max number of concurrent service searches that can * exist at any one time.
*/
try {
maxServiceSearches = Integer.parseInt(
LocalDevice.getProperty("bluetooth.sd.trans.max")); } catch (NumberFormatException e) {
System.out.println("General Application Error");
System.out.println("\tNumberFormatException: " + e.getMessage()); }
transactionID = new int[maxServiceSearches];
    // Initialize the transaction list
    for (int i = 0; i < maxServiceSearches; i++) {
        transactionID[i] = -1;
    }
    record = null;
    deviceList = new Vector();
}
/**
* Adds the transaction table with the transaction ID provided. *
* @param trans the transaction ID to add to the table */
private void addToTransactionTable(int trans) {
for (int i = 0; i < transactionID.length; i++) {
        if (transactionID[i] == -1) {
            transactionID[i] = trans;
            return;
} }
}
/**
* Removes the transaction from the transaction ID table. *
* @param trans the transaction ID to delete from the table */
private void removeFromTransactionTable(int trans) { for (int i = 0; i < transactionID.length; i++) {
        if (transactionID[i] == trans) {
            transactionID[i] = -1;
            return;
} }
}
/**
* Completes a service search on each remote device in the list until all
* devices are searched or until a printer is found that this application * can print to.
*
* @param devList the list of remote Bluetooth devices to search *
* @return true if a printer service is found; otherwise false if
* no printer service was found on the devList provided */
private boolean searchServices(RemoteDevice[] devList) { UUID[] searchList = new UUID[2];
/*
* Add the UUID for L2CAP to make sure that the service record
* found will support L2CAP. This value is defined in the * Bluetooth Assigned Numbers document.
*/
    searchList[0] = new UUID(0x0100);
/*
* Add the UUID for the printer service that we are going to use to
* the list of UUIDs to search for. (a fictional printer service UUID) */
searchList[1] = new UUID("1020304050d0708093a1b121d1e1f100", false);
/*
* Start a search on as many devices as the system can support. */
    for (int i = 0; i < devList.length; i++) {
/*
* If we found a service record for the printer service, then * we can end the search.
*/
        if (record != null) {
            return true;
}
try {
int trans = agent.searchServices(null, searchList, devList[i],
                this);
            addToTransactionTable(trans);
        } catch (BluetoothStateException e) {
            /*
* Failed to start the search on this device, try another * device.
*/
}
/*
* Determine if another search can be started. If not, wait for * a service search to end.
*/
        synchronized (this) {
ALL RIGHTS RESERVED UNDER JSPA (JAVA SPECIFICATION PARTICIPATION AGREEMENT)
} }
serviceSearchCount++;
if (serviceSearchCount == maxServiceSearches) {
    try {
        this.wait();
    } catch (Exception e) {
} }
/*
* Wait until all the service searches have completed. */
    while (serviceSearchCount > 0) {
        synchronized (this) {
            try {
                this.wait();
            } catch (Exception e) {
} }
}
    if (record != null) {
        return true;
    } else {
        return false;
} }
/**
* Finds the first printer that is available to print to.
*
* @return the service record of the printer that was found; null if no * printer service was found
*/
public ServiceRecord findPrinter() {
/*
* If there are any devices that have been found by a recent inquiry,
* we don't need to spend the time to complete an inquiry. */
RemoteDevice[] devList = agent.retrieveDevices(DiscoveryAgent.CACHED); if (devList != null) {
        if (searchServices(devList)) {
            return record;
} }
/*
* Did not find any printer services from the list of cached devices.
* Will try to find a printer service in the list of pre-known * devices.
*/
devList = agent.retrieveDevices(DiscoveryAgent.PREKNOWN); if (devList != null) {
    if (searchServices(devList)) {
        return record;
} }
/*
* Did not find a printer service in the list of pre-known or cached
* devices. So start an inquiry to find all devices that could be a * printer and do a search on those devices.
*/
/* Start an inquiry to find a printer   */
try {
agent.startInquiry(DiscoveryAgent.GIAC, this);
/*
* Wait until all the devices are found before trying to start the * service search.
*/
synchronized (this) {
         try {
             this.wait();
         } catch (Exception e) {
} }
} catch (BluetoothStateException e) { System.out.println("Unable to find devices to search");
}
if (deviceList.size() > 0) {
devList = new RemoteDevice[deviceList.size()]; deviceList.copyInto(devList);
    if (searchServices(devList)) {
        return record;
ALL RIGHTS RESERVED UNDER JSPA (JAVA SPECIFICATION PARTICIPATION AGREEMENT)
} }
    return null;
}
/**
* This is the main method of this application. It will print out * the message provided to the first printer that it finds.
*
* @param args[0] the message to send to the printer
*/
public static void main(String[] args) {
    PrintClient client = null;
/*
* Validate the proper number of arguments exist when starting this * application.
*/
if ((args == null) || (args.length != 1)) { System.out.println("usage: java PrintClient message"); return;
}
    /*
     * Create a new PrintClient object.
     */
    try {
        client = new PrintClient();
} catch (BluetoothStateException e) { System.out.println("Failed to start Bluetooth System"); System.out.println("\tBluetoothStateException: " +
}
/*
 * Find a printer in the local area
 */
ServiceRecord printerService = client.findPrinter(); if (printerService != null) {
/*
* Determine if this service will communicate over RFCOMM or * L2CAP by retrieving the connection string.
e.getMessage());
ALL RIGHTS RESERVED UNDER JSPA (JAVA SPECIFICATION PARTICIPATION AGREEMENT)
*/
String conURL = printerService.getConnectionURL(
ServiceRecord.NOAUTHENTICATE_NOENCRYPT, false); int index= conURL.indexOf(':');
String protocol= conURL.substring(0, index);
if (protocol.equals("btspp")) {
/*
* Since this printer service uses RFCOMM, create an RFCOMM * connection and send the data over RFCOMM.
*/
            /* code to call RFCOMM client goes here */
        } else if (protocol.equals("btl2cap")) {
                /*
                 * Since this service uses L2CAP, create an L2CAP
                 * connection to the service and send the data to the
                 * service over L2CAP.
                 */
          /* code to call L2CAP client goes here */
} else {
System.out.println("Unsupported Protocol");
}
} else {
System.out.println("No Printer was found");
} }
/**
* Called when a device was found during an inquiry. An inquiry
* searches for devices that are discoverable. The same device may * be returned multiple times.
*
* @see DiscoveryAgent#startInquiry
*
* @param btDevice the device that was found during the inquiry *
* @param cod the service classes, major device class, and minor
* device class of the remote device being returned *
April 5, 2002 Java APIs for Bluetooth Wireless Technology (JSR-82)
28
ALL RIGHTS RESERVED UNDER JSPA (JAVA SPECIFICATION PARTICIPATION AGREEMENT)
*/
public void deviceDiscovered(RemoteDevice btDevice, DeviceClass cod) {
/*
* Since service search takes time and we are already forced to * complete an inquiry, we will not do a service
* search on any device that is not an Imaging device.
* The device class of 0x600 is Imaging as
* defined in the Bluetooth Assigned Numbers document.
*/
if (cod.getMajorDeviceClass() == 0x600) { /*
} }
* Imaging devices could be a display, camera, scanner, or * printer. If the imaging device is a printer,
* then bit 7 should be set from its minor device
* class according to the Bluetooth Assigned
 * Numbers document.
*/
if ((cod.getMinorDeviceClass() & 0x80) != 0) {
/*
* Now we know that it is a printer. Now we will verify that
* it has a rendering service on it. A rendering service may
* allow us to print. We will have to do a service search to
* get more information if a rendering service exists. If this
* device has a rendering service then bit 18 will be set in * the major service classes.
*/
if ((cod.getServiceClasses() & 0x40000) != 0) { deviceList.addElement(btDevice);
} }
/**
* The following method is called when a service search is completed or
* was terminated because of an error. Legal status values * include:
* SERVICE_SEARCH_COMPLETED,
* SERVICE_SEARCH_TERMINATED,
* SERVICE_SEARCH_ERROR,
* SERVICE_SEARCH_DEVICE_NOT_REACHABLE, and
* SERVICE_SEARCH_NO_RECORDS. *
* @param transID the transaction ID identifying the request which
 * initiated the service search
 *
* @param respCode the response code which indicates the
* status of the transaction; guaranteed to be one of the * aforementioned only
*
*/
public void serviceSearchCompleted(int transID, int respCode) {
/*
* Removes the transaction ID from the transaction table. */
removeFromTransactionTable(transID);
    serviceSearchCount--;
    synchronized (this) {
        this.notifyAll();
} }
/**
* Called when service(s) are found during a service search.
* This method provides the array of services that have been found. *
* @param transID the transaction ID of the service search that is * posting the result
*
* @param service a list of services found during the search request *
* @see DiscoveryAgent#searchServices
*/
public void servicesDiscovered(int transID, ServiceRecord[] servRecord) {
/*
* If this is the first record found, then store this record * and cancel the remaining searches.
*/
    if (record == null) {
        record = servRecord[0];
/*
* Cancel all the service searches that are presently * being performed.
*/
April 5, 2002
Java APIs for Bluetooth Wireless Technology (JSR-82)
30
ALL RIGHTS RESERVED UNDER JSPA (JAVA SPECIFICATION PARTICIPATION AGREEMENT)
} }

でわでわ。。。


java midi Hello java sound〜javax.sound.midiでハローワールド〜

今回は、JavaでMidiを扱うための実装をしていきます。やはり、初めにハローワールドをやります。これにより基本的な情報を集めます。

具体的に

<作成したテストコード>

private void printInfo(MidiDevice.Info info) {
    System.out.println("*** Name ***");
    System.out.println(info.getName());
    System.out.println("*** Vendor ***");
    System.out.println(info.getVendor());
    System.out.println("*** Description ***");
    System.out.println(info.getDescription());
}

@Test
public void testMidiCreator() {
    MidiDevice.Info[] infos = MidiSystem.getMidiDeviceInfo();
    int i = 0;
    for (MidiDevice.Info inf : infos) {
        System.out.println("*** Info" + i + " ***");
        printInfo(inf);
        i++;
    }
    System.out.println("// シーケンサ");
    // シーケンサー
    printInfo(target.getSeq().getDeviceInfo());
    System.out.println("// シンセサイザ");
    // シンセサイザ
    printInfo(target.getSynth().getDeviceInfo());
}

<テスト対象クラス(実装するクラス)>

private Sequencer seq;
private Transmitter seqTrans;
private Synthesizer synth;
private Receiver synthRcvr;

/** コンストラクタ */
public MidiCreator() {
    try {
          seq = MidiSystem.getSequencer();
          seqTrans = seq.getTransmitter();
          synth = MidiSystem.getSynthesizer();
          synthRcvr = synth.getReceiver(); 
          seqTrans.setReceiver(synthRcvr);  
    } catch (MidiUnavailableException e) {
        e.printStackTrace();
          // handle or throw exception
    }
}
/** ゲッターとセッターは省略します */

そして、実行結果

////// init //////
*** Info0 ***
*** Name ***
Gervill
*** Vendor ***
OpenJDK
*** Description ***
Software MIDI Synthesizer
*** Info1 ***
*** Name ***
Real Time Sequencer
*** Vendor ***
Oracle Corporation
*** Description ***
Software sequencer
// シーケンサ
*** Name ***
Real Time Sequencer
*** Vendor ***
Oracle Corporation
*** Description ***
Software sequencer
// シンセサイザ
*** Name ***
Gervill
*** Vendor ***
OpenJDK
*** Description ***
Software MIDI Synthesizer

これはコンソールに出力した結果です。
そして実行画像は下にあります。

これは、Microbitからのメッセージを受けてMIDI音源を鳴らすための仕組みづくりの一環です。

作成したコードはGithubにアップしています。

ちなみに、MIDIを再生する順序は以下のようになります。

MIDIの再生

  1. デバイスを読み込むMidiSystem.getSequencer();
  2. Midiファイル(*.midなど)を読み込むnew File("midiファイルへのパス");
  3. 再生するデバイスにシーケンス(MIDIファイル)をセット
    Sequence mySeq = MidiSystem.getSequence(midi);
    seq.setSequence(mySeq);
  4. 再生処理seq.start();
  5. 再生する時間分処理を停止するThread.sleep(10000);
  6. 再生処理を停止するseq.stop();

こんな感じです。
実際に処理が動いて音がなるとわかっていても感動するものがあります。

でわでわ。。。


java midi 〜javax.sound.midiを使う〜

今回はJavaでMIDIを鳴らすためのプログラムを改定みようと思います。まずは、PC上で鳴らすことを考えます。
早い話が、JavaでMidiを扱う時の概要を理解しようというところです。

事の経緯

Microbitからメッセージを送信し、ラズパイで受けて適当なメッセージを作成しMIDI音源に送信、音を鳴らす。というものを作成しようとしています。

でわ。。。学習開始!

java.sound.midi

上のリンク先にはJavaDocがあります。そして、チュートリアルがありました。ここのページを学習します。

ちなみに、大元のページはこちらです。java sound APIのドキュメントになります。

Java Sound プログラマーズガイド

このページを学習します。

Midiを使う

シンプルにMIDIとは音源を鳴らすためのデータです。なのでこれを受け取ったMIDI音源はドラムとかピアノとか音を鳴らすわけです。じゃ、Javaでやろうとしたらどうやるか?
扱うデータは目で見えるようにすると下のようなイメージです。

そして、MIDIの概要を大まかに説明しているのはこちらのページです。ここでMIDIはどんなものか記載されています。
そして、Javaではどのような扱いをするのか記載しています。

プログラミング

JavaでMIDIを扱う時にはMidiSystemクラスを使用するようです。そして以下のものを使用できるようです。

  1. シーケンサ
  2. シンセサイザ
  3. トランスミッタ (MIDI 入力ポートに関連付けられたトランスミッタなど)
  4. レシーバ (MIDI 出力ポートに関連付けられたレシーバなど)
  5. 標準 MIDI ファイルのデータ
  6. サウンドバンクファイルのデータ

プログラムの実行手順

  1. デバイスの取得
  2. デバイスのオープン
  3. トランスミッタとレシーバの接続
  4. (デバイスへの)MIDIメッセージの送信

JavaでMIDIを使う場合は

JavaTM Sound API は、MIDI データ用のメッセージルーティングアーキテクチャーを指定します。

そして、トランスミッタ(MIDI入力)、レシーバ(MIDI出力)を使用します。

トランスミッタが MidiMessages を送信するレシーバの設定および問い合わせを行うためのメソッドが含まれます。

のようなので、この仕組みを使用してMIDI再生を行うプログラムを作ります。

Java Midi の仕組みについて

Java Sound API のメッセージ交換システム内の基本モジュール、以下にまとめます。
MidiDevice 、内容は以下に。。。
< シンセサイザ >
< シーケンサ >
< MIDI入力ポート >
< MIDI出力ポート >

サンプルコード

単一のデバイスの接続

    Sequencer seq;
    Transmitter seqTrans;
    Synthesizer synth;
    Receiver synthRcvr;
    try {
          seq = MidiSystem.getSequencer();
          seqTrans = seq.getTransmitter();
          synth = MidiSystem.getSynthesizer();
          synthRcvr = synth.getReceiver(); 
          seqTrans.setReceiver(synthRcvr);  
    } catch (MidiUnavailableException e) {
          // handle or throw exception
    }

複数のデバイスへの接続

    Synthesizer synth;
    Sequencer seq;
    MidiDevice inputPort;
    // [obtain and open the three devices...]
    Transmitter inPortTrans1, inPortTrans2;
    Receiver synthRcvr;
    Receiver seqRcvr;
    try {
          inPortTrans1 = inputPort.getTransmitter();
          synthRcvr = synth.getReceiver(); 
          inPortTrans1.setReceiver(synthRcvr);
          inPortTrans2 = inputPort.getTransmitter();
          seqRcvr = seq.getReceiver(); 
          inPortTrans2.setReceiver(seqRcvr);
    } catch (MidiUnavailableException e) {
          // handle or throw exception
    }

ぶっちゃけて複数のMIDI音源を使用するつもりはないので、単一のデバイスだけで良い気がしますが、もしかしたら複数ならしたい。。。となるかもしれないので記載しておきます。
が、まずは単一のデバイスを鳴らすことから始めます。

Javaコードを書く

とりあえずは、上のコードを色々と使用できるように「MidiCreator」という名前でクラスを作成しました。

public class MidiCreator {
    private Sequencer seq;
    private Transmitter seqTrans;
    private Synthesizer synth;
    private Receiver synthRcvr;

    /** コンストラクタ */
    public MidiCreator() {
        try {
              seq = MidiSystem.getSequencer();
              seqTrans = seq.getTransmitter();
              synth = MidiSystem.getSynthesizer();
              synthRcvr = synth.getReceiver(); 
              seqTrans.setReceiver(synthRcvr);  
        } catch (MidiUnavailableException e) {
              // handle or throw exception
        }
    }
}

コンストラクタで、使用するクラス群のセットアップを行なっています。ほとんどサンプルコードのコピーです。

今回は、ここまでにします。

でわでわ。。。

Microbit ラズパイ Bluetooth〜マイクロビットとラズパイ間をSDPで通信する〜

今回は、Microbitとラズパイの間をBluetooth経由で通信するためのサーバーを作成し始めようと思います。
参考にするページは本家Oracleのページです

元々のやりたいこと

一応この実装の目的は、Microbitからのbluetooth経由メッセージをラズパイで受信して、Midiメッセージを音源モジュールに送信、音を鳴らすというのが目的です。下はイメージになります。

SDPで通信

SDP(Sockets Direct Protocol)はMicrobitとラズパイの通信で使用できるという情報を得て、現在に至りますが、早い話が、Bluetoothでの通信時にこのSDPが使用できるということです。このテクノロジーを使用するためにサポートされて(JDKに入って)いるクラスは下に記載しました。(参考サイト参照)

  • java.net package
    • Socket
    • ServerSocket
  • java.nio.channels package:
    • SocketChannel
    • ServerSocketChannel
    • AsynchronousSocketChannel
    • AsynchronousServerSocketChannel

必要な作業

  1. SDP構成ファイルの作成
  2. SDPプロトコルの有効化
  3. SDPのデバッグ

こんな感じの作業が必要になると思いますが、如何せんやってみないことには始まらないので。。。

SDPサーバーを作る

SDP構成ファイルの作成このページを読んでみると、構成ファイル(設定ファイル)を作る必要がある、と記載しているのでその通りにやってみます。。。
しかし、記載ルールが書いてあるだけなのでよくわからない状態です。
わからないので調べます。そして、ちょうど良いのがありました。設定ファイルのテンプレートのようなものらしいです。早速失敬して。。。
ご丁寧に、全部コメントアウトされています。必要な部分を修正、コメントを外して使用します。

設定ファイル(Conf File)

#
# Configuration file to enable InfiniBand Sockets Direct Protocol.
#
# Each line that does not start with a comment (#) is a rule to indicate when
# the SDP transport protocol should be used. The format of a rule is as follows:
#   ("bind"|"connect") 1*LWSP-char (hostname|ipaddress["/"prefix]) 1*LWSP-char ("*"|port)["-"("*"|port)]
#
# A "bind" rule indicates that the SDP protocol transport should be used when
# a TCP socket binds to an address/port that matches the rule. A "connect" rule
# indicates that the SDP protocol transport should be used when an unbound
# TCP socket attempts to connect to an address/port that matches the rule.
# Addresses may be specified as hostnames or literal Internet Protocol (IP)
# addresses. When a literal IP address is used then a prefix length may be used
# to indicate the number of bits for matching (useful when a block of addresses
# or subnet is allocated to the InfiniBand fabric). 

# Use SDP for all sockets that bind to specific local addresses
#bind    192.168.4.1    *
#bind    fe80::21b:24ff:fe3d:7896    *

# Use SDP for all sockets that bind to the wildcard address in a port range
#bind    0.0.0.0    5000-5999
#bind    ::0        5000-5999

# Use SDP when connecting to all application services on 192.168.1.*
#connect 192.168.1.0/24       1024-*

# Use SDP when connecting to the http server or MySQL database on hpccluster.
#connect hpccluster.foo.com   80
#connect hpccluster.foo.com   3306

Socketの実装

以前作成したものですが、これに設定ファイルを適用すればいけるみたいです。下のものはSocketサーバーを起動するコードです。
クライアントから送信されたメッセージ(テキストなど)をそのまま返す処理になっています。

public void startServer() {
    try {
        System.out.println("*** SocketServer start " + server.isBound() + "***");
        Socket recieve = server.accept();
        System.out.println("*** Server Get Request start***");
        // 受信データの読み込み
        StringBuilder responseTxt = new StringBuilder("");
        // 受信状態
        System.out.println("クライアント: " + recieve.getRemoteSocketAddress());
        System.out.println("接続: " + recieve.isConnected());
        System.out.println("入力ストリームが閉じている: " + recieve.isInputShutdown());

        // 受信したリクエスト
        InputStream in = recieve.getInputStream();
        // 返却するレスポンス
        OutputStream writer = recieve.getOutputStream();
        System.out.print("Server recieve is ...");
        int c = 0;
        // CRとCRLFの場合で入力が終了している時がある
        while((c = in.read()) != -1) {
            char ch = (char)c;
            responseTxt.append(ch);
            // 空の場合
            if (c == 10 || c == 13) {
                break;
            }
        }
        System.out.println(responseTxt.toString());
        System.out.println("*** Server Send Response start***");
        // レスポンス送信
        writer.write((responseTxt.toString() + System.getProperty("file.separator")).getBytes());
        writer.flush();
        in.close();
        writer.close();
        System.out.println("*** SocketServer end ***");
    } catch (IOException e) {
        e.printStackTrace();
    } finally {
        // 開いたストリームを閉じる
        try {
            closeServer();
        } catch (IOException e) {
            e.printStackTrace();
        }
    }
}
一度書けばどこでも動くの精神

ということです(笑)
あとは動かしてみてうまくいくかどうか?を確認します。
そして、これをベースにして「〜を受信したときに〜する」というような処理を実装していきます。
ソースはGithubにコミットしてありますので、よかったら全体のソースも見てみてください、

でわでわ。。。