イントロダクション
前回は、ちょこっとだけSwingの概要に触れました。
Java Swing はOracleのチュートリアルもあるのでそちらも参考にしながら学習できます。
JFCとスイング
参考サイトによると、以下のような説明がありました。
JFC は Java Foundation Classes の略で、グラフィカル ユーザー インターフェイス (GUI) を構築し、豊富なグラフィック機能と対話性を Java アプリケーションに追加するための一連の機能を網羅しています。
他にも、JavaFXでも画面作成ができます。こちらはSceneBuilderというツールを使用して画面の作成ができます。
SceneBuilder1
SceneBuilder2
Swingは
画面を作成できるAPIでも、JavaFXと違い、JDKに同梱されているもので、JavaFXよりも細かい部分を操作できる。
※筆者の感想です。
Swingの基本構成
前回記載した様に土台がありその上にコンポーネントを配置します。
- JFrame, JDialog, JAppletの3クラスが土台になる
- Jlabel, JPanel, JTextField...etcはラベルやボタンなどの部品
// 土台クラス
JFrame frame = new JFrame("FirstSwing");
// 土台のコンポーネントを載せる部分(位置などは後で指定する)
// コンテナーと呼びます
Container con = frame.getContentPane();
//コンテナの大記載をしています
con.setSize(300, 300);
// コンテナの上にラベルを配置します
con.add(new JLabel("Hello Swing"));
// 土台の上に乗せたものをおきます
frame.setContentPane(con);
// お約束ごとで閉じる時にこのクラスの起動を終了する設定など。。。
frame.setDefaultCloseOperation(JFrame.EXIT_ON_CLOSE);
frame.pack();
// 画面を表示する設定→これをFALSEにすると画面が非表示になる
frame.setVisible(true);
ソースはここからダウンロードできます。
Swingのイメージ
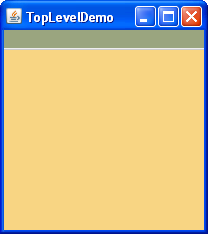
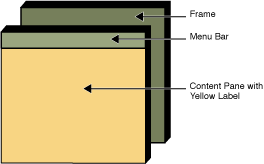
上記の図は、参考サイトから失敬しています。この図のように、JFrameの上にJMenubar, Contentpaneの上に黄色のラベルがのっかっていて
左側のように表示されています。
これから作成するアプリも、同様な形で作成されます。
JFrameの使い方
JFrameクラスでは、上の図のようにコンポーネント(画面の部品)を載せる(追加する)のにはContentPaneを使用して追加します。
下のコードでは、フレームにラベルを追加する処理を行っています。
JFrameをインスタンス化
JFrame frame = new JFrame();
Container cont = frame.getContentPane();
cont.add(new JLabel("ラベル1"));
そして、起動時に終了するときの処理「画面を閉じたらプログラムを終了する設定」と
フレームを表示する処理を行っています。
frame.pack()はコンポーネントのサイズにフレームを合わせる処理です。
// お約束ごとで閉じる時にこのクラスの起動を終了する設定など。。。
frame.setDefaultCloseOperation(JFrame.EXIT_ON_CLOSE);
frame.pack();
// 画面を表示する設定→これをFALSEにすると画面が非表示になる
frame.setVisible(true);
JFrameにコンポーネントを追加
下のコードは、チュートリアルにあるコードです。
frame.getContentPane().add(yellowLabel, BorderLayout.CENTER);このコードをわかりやすく書くと下のようになります。全体のコードはこちらにありました。
JFrame frame = new JFrame();

Container con = frame.getContentPane();

JLabel yellowLabel = new JLabel();
yellowLabel.setOpaque(true);
yellowLabel.setBackground(new Color(248, 213, 131));
yellowLabel.setPreferredSize(new Dimension(200, 180));

con.add(yelloLabel);
もっとたくさんの部品を追加したい場合は、JPanelを使用して、JFrame -> JPanel -> そのほかの部品のような関係で部品(コンポーネント)を追加します。
//Create a panel and add components to it.
JPanel contentPane = new JPanel(new BorderLayout());
contentPane.setBorder(someBorder);
contentPane.add(someComponent, BorderLayout.CENTER);
contentPane.add(anotherComponent, BorderLayout.PAGE_END);
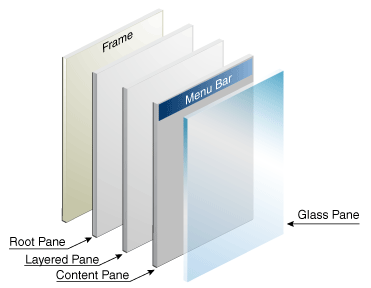
やはり、プログラムを組んだ時の完成図はイメージするしかないので、下のようなイメージを持つとわかりやすいと思います。
サンプルコード
参考サイトはこちらです。
/** An application that requires no other files. */
public class GlassPaneDemo {
    static private MyGlassPane myGlassPane;

    /**
     * Create the GUI and show it.  For thread safety,
     * this method should be invoked from the
     * event-dispatching thread.
     */
    private static void createAndShowGUI() {
        //Create and set up the window.
        JFrame frame = new JFrame("GlassPaneDemo");
        frame.setDefaultCloseOperation(JFrame.EXIT_ON_CLOSE);

        //Start creating and adding components.
        JCheckBox changeButton =
                new JCheckBox("Glass pane \"visible\"");
        changeButton.setSelected(false);

        //Set up the content pane, where the "main GUI" lives.
        Container contentPane = frame.getContentPane();
        contentPane.setLayout(new FlowLayout());
        contentPane.add(changeButton);
        contentPane.add(new JButton("Button 1"));
        contentPane.add(new JButton("Button 2"));

        //Set up the menu bar, which appears above the content pane.
        JMenuBar menuBar = new JMenuBar();
        JMenu menu = new JMenu("Menu");
        menu.add(new JMenuItem("Do nothing"));
        menuBar.add(menu);
        frame.setJMenuBar(menuBar);

        //Set up the glass pane, which appears over both menu bar
        //and content pane and is an item listener on the change
        //button.
        myGlassPane = new MyGlassPane(changeButton, menuBar,
                                      frame.getContentPane());
        changeButton.addItemListener(myGlassPane);
        frame.setGlassPane(myGlassPane);

        //Show the window.
        frame.pack();
        frame.setVisible(true);
    }

    public static void main(String[] args) {
        //Schedule a job for the event-dispatching thread:
        //creating and showing this application's GUI.
        javax.swing.SwingUtilities.invokeLater(new Runnable() {
            public void run() {
                createAndShowGUI();
            }
        });
    }
}

/**
 * We have to provide our own glass pane so that it can paint.
 */
class MyGlassPane extends JComponent
                  implements ItemListener {
    Point point;

    //React to change button clicks.
    public void itemStateChanged(ItemEvent e) {
        setVisible(e.getStateChange() == ItemEvent.SELECTED);
    }

    protected void paintComponent(Graphics g) {
        if (point != null) {
            g.setColor(Color.red);
            g.fillOval(point.x - 10, point.y - 10, 20, 20);
        }
    }

    public void setPoint(Point p) {
        point = p;
    }

    public MyGlassPane(AbstractButton aButton,
                       JMenuBar menuBar,
                       Container contentPane) {
        CBListener listener = new CBListener(aButton, menuBar,
                                             this, contentPane);
        addMouseListener(listener);
        addMouseMotionListener(listener);
    }
}

/**
 * Listen for all events that our check box is likely to be
 * interested in.  Redispatch them to the check box.
 */
class CBListener extends MouseInputAdapter {
    Toolkit toolkit;
    Component liveButton;
    JMenuBar menuBar;
    MyGlassPane glassPane;
    Container contentPane;

    public CBListener(Component liveButton, JMenuBar menuBar,
                      MyGlassPane glassPane, Container contentPane) {
        toolkit = Toolkit.getDefaultToolkit();
        this.liveButton = liveButton;
        this.menuBar = menuBar;
        this.glassPane = glassPane;
        this.contentPane = contentPane;
    }

    public void mouseMoved(MouseEvent e) {
        redispatchMouseEvent(e, false);
    }

    public void mouseDragged(MouseEvent e) {
        redispatchMouseEvent(e, false);
    }

    public void mouseClicked(MouseEvent e) {
        redispatchMouseEvent(e, false);
    }

    public void mouseEntered(MouseEvent e) {
        redispatchMouseEvent(e, false);
    }

    public void mouseExited(MouseEvent e) {
        redispatchMouseEvent(e, false);
    }

    public void mousePressed(MouseEvent e) {
        redispatchMouseEvent(e, false);
    }

    public void mouseReleased(MouseEvent e) {
        redispatchMouseEvent(e, true);
    }

    //A basic implementation of redispatching events.
    private void redispatchMouseEvent(MouseEvent e,
                                      boolean repaint) {
        Point glassPanePoint = e.getPoint();
        Container container = contentPane;
        Point containerPoint = SwingUtilities.convertPoint(
                                        glassPane,
                                        glassPanePoint,
                                        contentPane);
        if (containerPoint.y < 0) { //we are not in the content pane
            if (containerPoint.y + menuBar.getHeight() >= 0) {
                //The mouse event is over the menu bar.
                //Could handle specially.
            } else {
                //The mouse event is over non-system window
                //decorations, such as the ones provided by
                //the Java look and feel.
                //Could handle specially.
            }
        } else {
            //The mouse event is probably over the content pane.
            //Find out exactly which component it is over.
            Component component = SwingUtilities.getDeepestComponentAt(
                                        container,
                                        containerPoint.x,
                                        containerPoint.y);

            if ((component != null)
                && (component.equals(liveButton))) {
                //Forward events over the check box.
                Point componentPoint = SwingUtilities.convertPoint(
                                            glassPane,
                                            glassPanePoint,
                                            component);
                component.dispatchEvent(new MouseEvent(component,
                                                     e.getID(),
                                                     e.getWhen(),
                                                     e.getModifiers(),
                                                     componentPoint.x,
                                                     componentPoint.y,
                                                     e.getClickCount(),
                                                     e.isPopupTrigger()));
            }
        }

        //Update the glass pane if requested.
        if (repaint) {
            glassPane.setPoint(glassPanePoint);
            glassPane.repaint();
        }
    }
}
サンプルコード解説
上記のプログラムを解説します。まずはこのようなプログラムを見るときにメインメソッドを探します。
理由は必ずメインメソッドが動くからです。
メインメソッド
public static void main(String[] args) {
    //Schedule a job for the event-dispatching thread:
    //creating and showing this application's GUI.
    javax.swing.SwingUtilities.invokeLater(new Runnable() {
        public void run() {
            createAndShowGUI();
        }
    });
}単純にcreateAndShowGUI()を起動しているだけですね。細かいところを言うと、こちらのサイトにあるように「イベントディスパッチスレッドで非同期的に実行させます。
」ということなので、重い処理は後から非同期で実行する設定だと思ってもらえれば、OKです。
言葉を変えるならば、非同期で処理を実行するので画面の描画中にほかの処理も残ったリソースで実行してくれる設定をしているということです。
createAndShowGUI()
JFrameを生成して、CheckBoxとMenubarを生成。JButtonも同様に生成。
JFrame frame = new JFrame("GlassPaneDemo");
frame.setDefaultCloseOperation(JFrame.EXIT_ON_CLOSE);

//Start creating and adding components.
JCheckBox changeButton =
new JCheckBox("Glass pane \"visible\"");
changeButton.setSelected(false);

//Set up the content pane, where the "main GUI" lives.
Container contentPane = frame.getContentPane();
contentPane.setLayout(new FlowLayout());
contentPane.add(changeButton);
contentPane.add(new JButton("Button 1"));
contentPane.add(new JButton("Button 2"));

//Set up the menu bar, which appears above the content pane.
JMenuBar menuBar = new JMenuBar();
JMenu menu = new JMenu("Menu");
menu.add(new JMenuItem("Do nothing"));
menuBar.add(menu);
frame.setJMenuBar(menuBar);
インナークラスである「MyGlassPane」はフィールド変数に定義、最終的には、JFrameにセットしている(setGlassPane())
//Set up the glass pane, which appears over both menu bar
//and content pane and is an item listener on the change
//button.
myGlassPane = new MyGlassPane(changeButton, menuBar,
frame.getContentPane());
changeButton.addItemListener(myGlassPane);
frame.setGlassPane(myGlassPane);途中「changeButton.addItemListener(myGlassPane);」では、「項目選択イベントが発生すると、リスナー・オブジェクトのitemStateChangedメソッドが呼び出されます。」ので、「項目の選択」を行ったときの処理を行うのは「itemStateChanged()」でありますよ。と設定しています。
ちなみに、ItemListenerのメソッドをitemStateChangedはオーバーライドしています。
class MyGlassPane extends JComponent implements ItemListener {
    //React to change button clicks.
    public void itemStateChanged(ItemEvent e) {
        setVisible(e.getStateChange() == ItemEvent.SELECTED);
    }
}
他の部分は、マウスリスナー(マウス操作時の処理)を定義しています。
でわでわ。。。
関連ページ一覧
Eclipse セットアップ
- Java Install Eclipse〜開発ツールのインストール〜
- TensorFlow C++環境〜EclipseにCDTをインストール〜
- Setup OpenGL with Java〜JOGLを使う準備 for Eclipse〜
- Eclipse Meven 開発手順〜プロジェクトの作成〜
- Java OpenCV 環境セットアップ(on Mac)
- Eclipse SceneBuilderを追加する
- JavaFX SceneBuilder 〜EclipseとSceneBuilder連携~
Java Basic一覧
- Java Basic Level 1 〜Hello Java〜
- Java Basic Level2 〜Arithmetic Calculate〜
- Java Basic Level3 〜About String class〜
- Java Basic Level 4〜Boolean〜
- Java Basic Level 5〜If Statement〜
- Java Basic Summary from Level1 to 5
- Java Basic Level 6 〜Traning of If statement〜
- Java Basic Level8 〜How to use for statement〜
- Java Basic Level 8.5 〜Array〜
- Java Basic Level 9〜Training of for statement〜
- Java Basic Level 10 〜While statement 〜
- Java Basic Swing〜オブジェクト指向〜
- Java Basic Swing Level 2〜オブジェクト指向2〜
- サンプル実装〜コンソールゲーム〜
- Java Basic インターフェース・抽象クラスの作り方
- Java Basic クラスとは〜Step2_1〜
- Java Basic JUnit 〜テストスイートの作り方〜